Twenty years in cloud infrastructure teaches you to be skeptical of tools that claim to solve everything. Most of them solve one thing well and everything else poorly. Cilium is one of the rare exceptions. I’ve watched it evolve from “a CNI plugin that uses eBPF” into a platform that legitimately consolidates your network data plane, kube-proxy replacement, L7-aware network policies, cluster-level observability, and runtime security enforcement into a single coherent system. If you’re still running Calico or Flannel with a separate service mesh and a separate runtime security agent, you’re operating three stacks where one will do the job.
Let me be direct about what this article covers. If you need a primer on eBPF fundamentals, I’ve written about how eBPF is revolutionizing Kubernetes networking and observability separately. If you’re comparing CNI options for the first time, the Kubernetes CNI plugins and network policies comparison gives you the lay of the land. This article is for teams past the basics: how Cilium works in production at depth, why you should replace kube-proxy with it, how Hubble surfaces network issues you’d otherwise miss entirely, and how to actually migrate off whatever you’re running today.
Why Traditional Kubernetes Networking Breaks Under Load
Before getting into Cilium’s architecture, it’s worth understanding what problem it actually solves. Traditional Kubernetes networking relies on iptables for service load balancing through kube-proxy. This works fine at small scale and degrades badly at large scale.
Here’s what happens: every Kubernetes service you create triggers kube-proxy to add iptables rules on every single node in the cluster. For a cluster running 200 services across 50 nodes, you’re managing thousands of iptables rules that must stay synchronized everywhere. More importantly, iptables evaluation is sequential. The kernel walks the chain top to bottom until it finds a match. In a cluster with hundreds of services, that’s hundreds of rule checks per packet. Latency creeps upward. CPU burns on kube-proxy syncing rules on every API event.
I ran one cluster at a major e-commerce company that had over 400 services. kube-proxy was consuming more CPU than several of the workloads it was routing traffic for. Debugging why was entertaining in retrospect, less so at the time.
Beyond kube-proxy, the traditional architecture piles up agents. CNI for pod networking, kube-proxy for service routing, a separate network policy controller, and if you want service mesh features like mTLS or L7 observability, you’re injecting Envoy sidecars into every pod. Each sidecar typically adds 30 to 50 MB of memory overhead, startup latency, and an extra network hop per request. At scale, sidecar injection becomes its own operational problem.
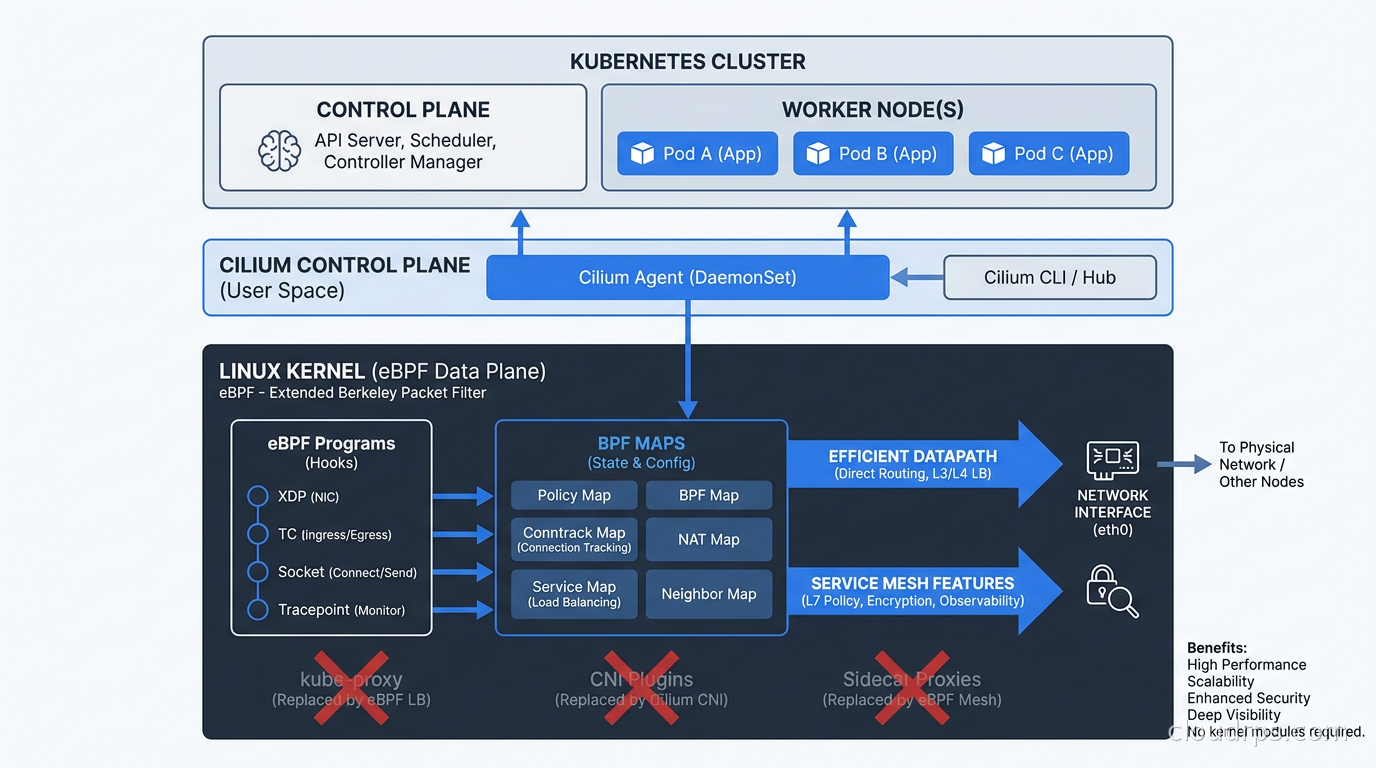
Cilium’s answer is to push the data plane into the Linux kernel using eBPF, then provide a unified control plane that handles everything from pod networking to security enforcement.
The eBPF Architecture
To understand why Cilium outperforms iptables-based networking, you need to grasp one key insight: eBPF programs attach to kernel hooks like network ingress/egress events, socket operations, and syscall entry/exit points. They run in kernel space without requiring kernel module compilation or reboots. They’re JIT-compiled, sandboxed, and can read and write BPF maps, which are shared key-value stores accessible from both kernel-space eBPF programs and userspace.
For networking, Cilium attaches eBPF programs to the network driver layer of each pod’s virtual ethernet interface. Every packet entering or leaving a pod passes through an eBPF program before it ever reaches iptables. Service load balancing lookups become hash map lookups: O(1) regardless of cluster size. Adding a Kubernetes service means inserting one entry into a BPF map. Not appending rules to a chain.
The Cilium agent runs on each node as a privileged DaemonSet pod. It compiles eBPF programs and loads them into the kernel, manages BPF maps, and handles control-plane communication with the Kubernetes API server. The agent watches for pod, service, and CRD changes, and updates BPF maps in response. The data plane itself runs entirely in kernel space. The agent is not in the packet path at all.

Replacing kube-proxy: The First Thing You Should Do
The highest-impact day-one configuration change when deploying Cilium is enabling full kube-proxy replacement. This replaces iptables-based service routing with pure BPF.
In Helm:
kubeProxyReplacement: "true"
k8sServiceHost: "your-api-server-ip"
k8sServicePort: "6443"
With this enabled, Cilium handles all Kubernetes service types: ClusterIP, NodePort, LoadBalancer, and ExternalIPs. The difference shows up clearly in clusters with many services. I’ve seen NodePort connection latency drop by 30 to 40 percent after migrating from kube-proxy to Cilium BPF mode, because the kernel stops walking iptables chains entirely.
Cilium also implements Direct Server Return (DSR) for NodePort and LoadBalancer services. With DSR, when a packet arrives at a node via a LoadBalancer IP, Cilium rewrites the source IP and routes the reply directly back to the client, bypassing the original node. This halves the network path for most external traffic and significantly reduces bandwidth consumed by the load balancer node.
One operational detail: you’ll want to remove kube-proxy before or alongside enabling full replacement. On EKS or GKE, this means deploying Cilium with kube-proxy disabled during cluster creation. On existing clusters, drain and remove kube-proxy pods after Cilium is stable. On a live cluster, do this carefully and have a rollback plan.
Network Policies That Express What You Actually Mean
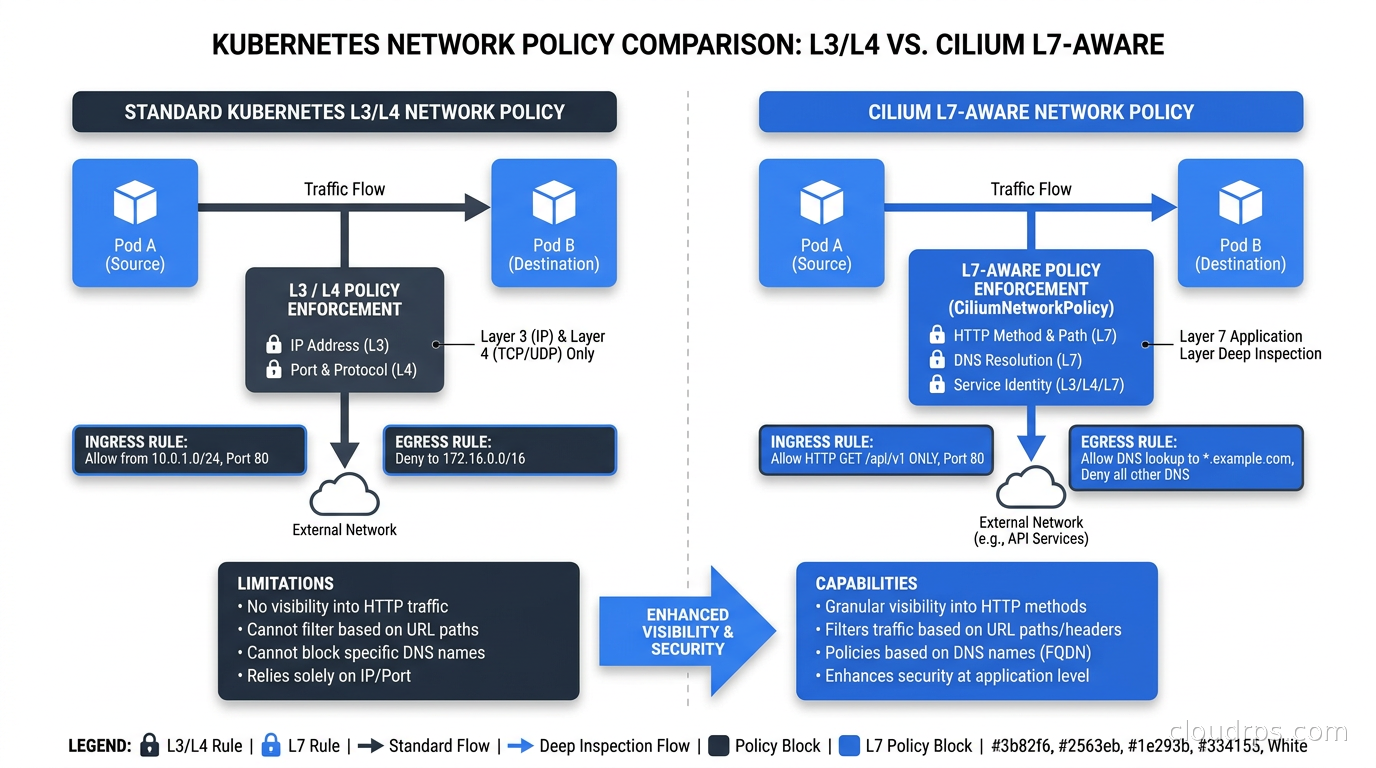
Vanilla Kubernetes network policies operate at L3 and L4. You can say “allow traffic from pods labeled app=frontend to pods labeled app=backend on port 8080.” Full stop. You cannot say “allow only HTTP POST requests to /api/v1/charge from the checkout service.” For anything more granular, you’re enforcing it in application code or not at all.
Cilium Network Policy via the CiliumNetworkPolicy CRD adds L7 awareness for HTTP, gRPC, and DNS. Here’s what a meaningful HTTP policy looks like:
apiVersion: "cilium.io/v2"
kind: CiliumNetworkPolicy
metadata:
  name: restrict-payment-service
spec:
  endpointSelector:
    matchLabels:
      app: payment-service
  ingress:
  - fromEndpoints:
    - matchLabels:
        app: checkout-service
    toPorts:
    - ports:
      - port: "8080"
        protocol: TCP
      rules:
        http:
        - method: "POST"
          path: "/api/v1/charge"
This permits POST requests to /api/v1/charge from the checkout service only. If the checkout service pod tries a GET request, a different path, or any other service tries anything at all, Cilium drops it at the kernel level before the packet reaches the payment service. Without Cilium, this enforcement either lives in application logic or doesn’t exist.
I’ve used this pattern extensively in financial services environments where PCI DSS requires documenting and enforcing exactly which services can reach cardholder data endpoints. Cilium’s L7 policies make that enforcement declarative and auditable: your security team reads the CiliumNetworkPolicy YAML and knows precisely what’s permitted. There’s no application-layer mystery.
DNS-based egress policies are equally powerful. You can restrict pods to resolving only specific DNS patterns, preventing compromised containers from querying attacker-controlled domains. Paired with zero trust security principles, this gives you genuine content-aware network enforcement, not just port and IP filtering.
Hubble: Actually Seeing Your Network
Here’s a scenario I’ve lived through more than once. An alert fires on elevated latency between two services. You check application metrics, distributed traces, application logs. Everything looks clean at the application layer. The problem is somewhere in the network and you have no visibility into it. You end up deploying tcpdump on a node and manually correlating packet captures with service names. It’s miserable work.
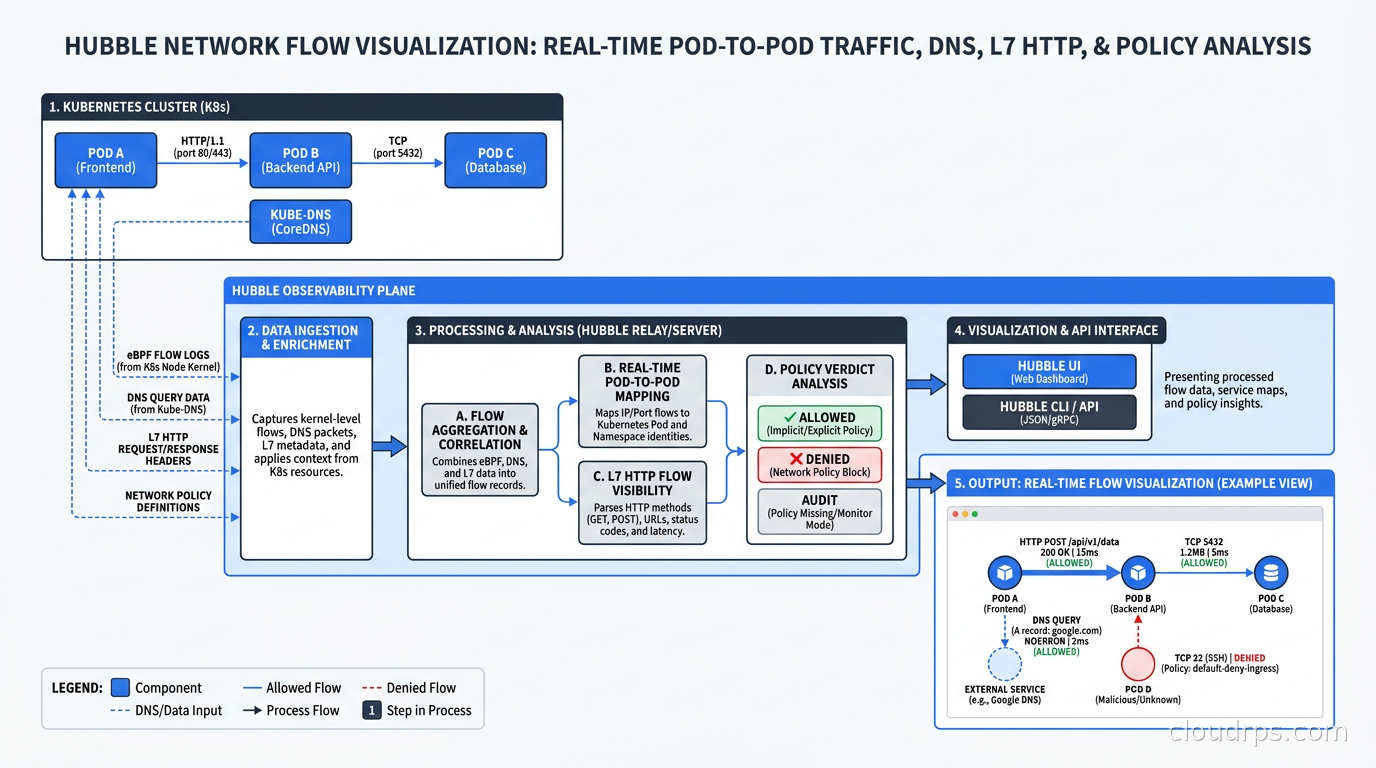
Hubble is Cilium’s built-in observability layer, and it gives you per-flow visibility across your entire cluster: source pod, destination pod, protocol, HTTP method and path, response code, latency, and whether the connection was allowed or dropped by a network policy.
The Hubble relay aggregates flow data from all nodes into a single query endpoint. The Hubble UI renders a visual service dependency map. The CLI lets you query flows in real time:
# Show all dropped connections in the production namespace
hubble observe --namespace production --verdict DROPPED

# Show HTTP flows from the payment service
hubble observe --pod payment-service --protocol http --last 100

# Export drops as JSON for further analysis
hubble observe --namespace production --type drop -j | jq '.flow | {src: .source.pod_name, dst: .destination.pod_name, reason: .drop_reason_desc}'
DNS visibility through Hubble is something I use constantly. Every DNS query from every pod in the cluster is recorded. When a pod is making unexpected DNS lookups, Hubble surfaces it immediately. I’ve caught misconfigured staging applications hitting production service endpoints this way, something that was nearly invisible with traditional tooling.
Hubble integrates with Prometheus and Grafana. Cilium ships pre-built dashboards covering connection rates, DNS query rates, policy drop rates, and HTTP error rates by service. Wiring this into your existing Prometheus and Grafana observability stack takes roughly twenty minutes and immediately gives you network-layer SLOs you didn’t have before.
One important architectural note: Hubble stores flows in a ring buffer per node by default. It is not a persistent datastore. For compliance requirements needing long-term retention, configure Hubble to export flows via OpenTelemetry or a dedicated Hubble enterprise export configuration.
Tetragon: Enforcement at the Kernel Level
Cilium’s security story extends beyond network policies with Tetragon, the runtime security component. Where tools like Falco detect suspicious behavior and fire alerts, Tetragon can block behavior at the kernel level using eBPF.
Tetragon uses a TracingPolicy CRD to define what kernel events to observe or enforce. You can watch file access, outbound network connections, process execution, and privilege escalation attempts. The critical difference from detection-only tools is the action: a TracingPolicy with a Signal: SIGKILL action terminates a process the moment it violates the policy, before the syscall completes.
A useful baseline policy for data processing pods that should only talk to internal services blocks outbound TCP connections to public IP ranges entirely. When a compromised container attempts to connect to an attacker-controlled server, the connection attempt is killed before it establishes.
The practical difference between detection and enforcement matters in real incidents. Detection tells you something happened after the fact. Enforcement means the attack fails. For pods handling sensitive data, the ability to enforce at the kernel level that “this container will never make an outbound connection to a public IP” is a genuine security property, regardless of what’s executing inside the container.
Tetragon pairs naturally with container runtime security tooling you may already have. If you’re running Falco for detection, run Tetragon for enforcement in parallel while you build policy confidence, then lean into enforcement once you’ve validated the rules in staging.
Transparent Encryption Without Application Changes
One of the less-discussed capabilities in Cilium is transparent node-to-node encryption. When enabled, all traffic between nodes is encrypted using either WireGuard or IPsec, with no changes required to applications or pods.
WireGuard mode is what I recommend for most deployments. Each node gets a WireGuard keypair generated by Cilium, and public keys are distributed via Kubernetes Secrets. Traffic between pods on different nodes is encrypted and decrypted at the kernel level by WireGuard, using the same fast modern cryptography I’ve covered in the WireGuard production guide.
encryption:
  enabled: true
  type: wireguard
This satisfies encryption-in-transit compliance requirements without requiring mutual TLS in application code or sidecar injection. For workloads where a full service mesh is too heavy, Cilium’s transparent encryption provides a network-layer guarantee that’s invisible to the application.
BGP Mode and Cluster Mesh
For teams running Kubernetes on bare metal or in private clouds, Cilium’s BGP Control Plane is how you integrate with your datacenter routing fabric. Instead of VXLAN overlays, Cilium advertises pod CIDRs and LoadBalancer service IPs directly via BGP to top-of-rack switches.
The CiliumBGPPeeringPolicy CRD defines your BGP peers and export configuration. With direct routing via BGP, pods get routable IPs on the datacenter network. LoadBalancer service IPs advertised via BGP appear on your switches without MetalLB or a hardware load balancer. This is how clusters at companies like Cloudflare operate at scale.
For multi-cluster setups, Cilium’s Cluster Mesh extends service discovery across clusters. Each cluster runs its own Cilium installation, and the Cluster Mesh control plane federates service endpoints. A pod in cluster-A reaches a service in cluster-B via its standard Kubernetes service name, no additional service mesh required. Global services (services that load balance across clusters) are enabled by annotating the service with service.cilium.io/global: "true". For teams dealing with Kubernetes multi-cluster management, this significantly reduces the tooling surface area needed for cross-cluster communication.
Migrating Off Calico or Flannel
This is the question everyone asks, and the honest answer is: live in-place migration on a production cluster is genuinely hard, and I don’t recommend it unless you have excellent rollback procedures and a low-traffic maintenance window.
The safest approach is a new cluster. Spin up a fresh cluster with Cilium from day one, migrate workloads through your existing deployment pipeline, and decommission the old cluster. For most organizations this is the pragmatic choice. Your pipeline doesn’t change, your application manifests don’t change, and the cut-over is a DNS or load balancer update.
If you must do in-place migration, Cilium provides a migration mode allowing both Cilium and an existing CNI to run simultaneously during transition. You cordon and drain nodes one at a time, Cilium takes over as each node is reprovisioned, and you remove the old CNI after all nodes migrate. This works, but it’s a multi-hour process on large clusters and requires thorough staging validation first.
One gotcha for Calico migrations: standard Kubernetes NetworkPolicy resources are portable and Cilium honors them natively. Calico-specific CRDs like GlobalNetworkPolicy require conversion to CiliumClusterwideNetworkPolicy. Do the inventory of your policy objects before you start the migration, not after.
A War Story: Two Weeks to Twenty Minutes
About four years into running a large Kubernetes platform at a retail company, we had a persistent issue where roughly 0.1 percent of database connections from one service were timing out. Intermittent, hard to reproduce, and the application team was convinced it was a PostgreSQL bug. We spent two weeks examining database metrics, application retry logic, and connection pooling configuration in exhaustive detail. Nothing explained the pattern.
After deploying Cilium and enabling Hubble, we had the answer in twenty minutes. Hubble showed that connection attempts from that service were being dropped by a network policy, but only intermittently, only when specific pods restarted. The policy had a stale pod selector that matched some pod revisions but not others depending on label application timing during rollout. The application retry logic was working correctly, which made the whole thing look like a transient database issue rather than a policy drop.
Two weeks of investigation, solved in twenty minutes. That is the real value of Hubble: not the impressive live demo, but the ability to surface exactly what’s happening on the network when something breaks in production.
When to Use Cilium and When the Existing Stack Is Fine
Cilium is the right choice for the large majority of Kubernetes deployments in 2026. The kernel requirements (Linux 4.19 minimum, 5.10 or newer recommended for the full feature set including WireGuard encryption) are met by every major cloud provider’s default node OS. Installation complexity has dropped significantly: the Helm chart covers most use cases, the Cilium CLI handles validation, and the documentation has matured considerably.
Situations where Cilium adds friction: very old kernels (pre-4.19 unsupported), Windows nodes (Cilium is Linux-only), and specialized networking setups with hardware offloads that predate eBPF. For those constraints, Calico with IPIP or VXLAN mode remains a reasonable choice.
If you’re running a service mesh today, look at Istio’s ambient mesh mode which uses Cilium for the network layer and adds mTLS and L7 traffic management via ztunnel and waypoint proxies. The combination gives you everything without per-pod sidecar overhead.
For teams that don’t need full service mesh capabilities but want mTLS between services, Cilium’s built-in mutual authentication integrates with SPIFFE and SPIRE for workload identity. Enable it with authentication.mutual.spiffe.enabled=true. You get cryptographic identity for every workload and policy enforcement based on that identity, without an additional mesh layer in the data path.
Getting Started in a New Cluster
The fastest path to Cilium in a new cluster is via the Cilium CLI:
cilium install --version 1.16.0 \
  --set kubeProxyReplacement=true \
  --set hubble.relay.enabled=true \
  --set hubble.ui.enabled=true
Validate the installation:
cilium status --wait
cilium connectivity test
The connectivity test suite is one of the better pieces of Cilium tooling. It deploys test pods across namespaces, runs traffic through various policy configurations, and validates that each capability is working correctly. Run it after any significant configuration change and during post-migration verification.
The Kubernetes autoscaling infrastructure works transparently with Cilium: nothing about HPA, VPA, or KEDA is CNI-specific. What does change once you have Cilium running is your willingness to build actual network segmentation. With Hubble giving you visibility and L7 policy enforcement available declaratively, building a zero trust network architecture inside your cluster shifts from aspirational to achievable. Deny by default, allow explicitly, audit with Hubble. That is a security posture you can actually defend.
Twenty years in, I still get a little excited when a tool genuinely changes how you operate infrastructure. Cilium is one of those tools.
Get Cloud Architecture Insights
Practical deep dives on infrastructure, security, and scaling. No spam, no fluff.
By subscribing, you agree to receive emails. Unsubscribe anytime.