SSH is one of those tools that most engineers use every single day without understanding what happens underneath. You type ssh user@server, enter your password or it picks up your key, and suddenly you have a shell on a remote machine. It feels like magic, and honestly the protocol that makes it happen is one of the most elegant pieces of security engineering ever built.
I have been using SSH since it replaced Telnet in the late 1990s. I remember the transition, convincing sysadmins to move from Telnet and rlogin to this “new” protocol that added encryption overhead. The overhead argument seems laughable now, but at the time, on the hardware we had, it was a real conversation. What settled it was when I demonstrated a Telnet session being sniffed with tcpdump, showing passwords flying by in cleartext. That ended the debate fast.
Let me take you through how SSH actually works, from the initial TCP connection through key exchange, authentication, and the encrypted session that follows.
The Three Layers of SSH
The SSH protocol (SSH-2, which is the only version anyone should be running) is organized into three layers, each handling a distinct aspect of the secure connection:
- Transport Layer: Handles the initial key exchange, server authentication, encryption, and integrity protection
- User Authentication Layer: Verifies the identity of the user connecting
- Connection Layer: Multiplexes the encrypted tunnel into logical channels for shell sessions, file transfers, and port forwarding
These layers build on top of each other. The transport layer establishes the encrypted tunnel first. Then the authentication layer runs inside that tunnel. Finally, the connection layer manages actual session traffic.
Step 1: The TCP Connection and Protocol Negotiation
SSH runs over TCP, typically on port 22. When you run ssh user@server, the first thing that happens is a standard TCP three-way handshake. Nothing fancy yet, just a plain TCP connection.
Once TCP is established, both sides exchange protocol version strings. The client sends something like SSH-2.0-OpenSSH_9.6 and the server responds with its own version string. This is plaintext, so anyone watching the network can see what SSH implementations and versions are in use. That is fine; the sensitive stuff comes next.
Step 2: Key Exchange (The Critical Part)
The key exchange is where the magic happens. This is where client and server agree on a shared secret without ever transmitting that secret over the network. If you understand symmetric vs asymmetric encryption, this is where those concepts come together beautifully.
Algorithm Negotiation
First, client and server exchange lists of supported algorithms for:
- Key exchange methods (e.g., curve25519-sha256, ecdh-sha2-nistp256, diffie-hellman-group16-sha512)
- Host key types (e.g., ssh-ed25519, ecdsa-sha2-nistp256, rsa-sha2-512)
- Encryption ciphers (e.g., chacha20-poly1305, aes256-gcm, aes256-ctr)
- MAC algorithms (e.g., hmac-sha2-256-etm, hmac-sha2-512-etm)
- Compression algorithms
For each category, the first algorithm on the client’s list that also appears on the server’s list wins. This is why the order of algorithms in your SSH configuration matters: it determines your preference.
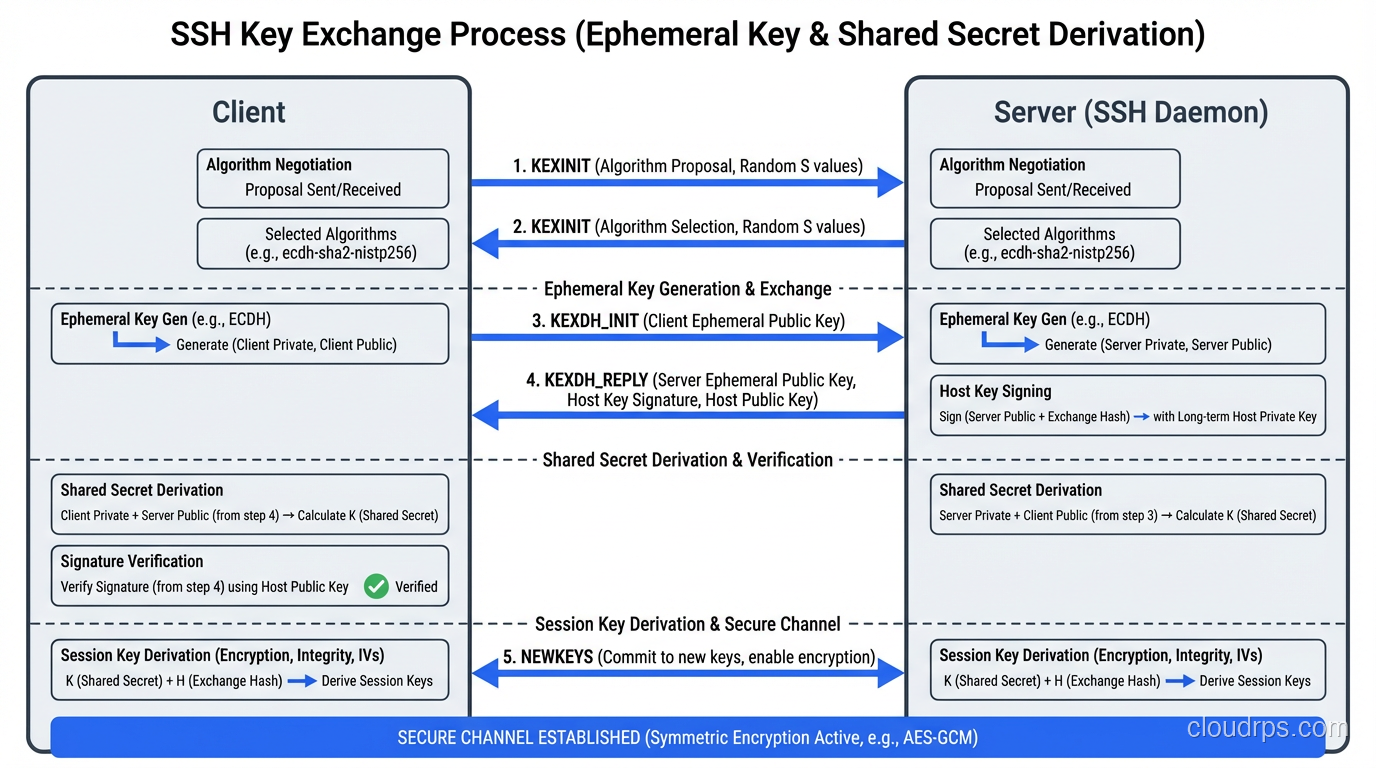
The Diffie-Hellman Exchange
The most common key exchange method today is Curve25519, which is an elliptic curve Diffie-Hellman (ECDH) exchange. Here is what happens:
- Both client and server generate ephemeral (temporary) key pairs, a private key and a public key, used only for this session
- They exchange their public keys
- Each side combines their own private key with the other side’s public key to compute the same shared secret independently
- This shared secret is used to derive the session encryption keys
The beauty of Diffie-Hellman is that an observer who sees both public keys exchanged over the network cannot compute the shared secret. The math only works if you have one of the private keys, which never leaves the machine that generated it.
From this shared secret, both sides derive four keys:
- Client-to-server encryption key
- Server-to-client encryption key
- Client-to-server MAC key
- Server-to-client MAC key
Every packet from this point forward is encrypted and integrity-protected.
Forward Secrecy
Because the key exchange uses ephemeral keys (generated fresh for each session and discarded afterward), SSH provides forward secrecy. If an attacker records your encrypted SSH session today and somehow obtains your server’s private host key tomorrow, they still cannot decrypt the recorded session. The session keys were derived from ephemeral keys that no longer exist.
This is the same principle behind ECDHE in TLS, and it is one of the things that makes SSH fundamentally more secure than protocols that reuse static keys for encryption.
Step 3: Host Key Verification
During the key exchange, the server also proves its identity by signing the exchange hash with its private host key. The client verifies this signature using the server’s public host key.
This is the moment you see this message on your first connection:
The authenticity of host 'server.example.com (192.0.2.1)' can't be established.
ED25519 key fingerprint is SHA256:xxxxxxxxxxxxxxxxxxxxxxxxxxxxxxxxxxxxxxxxxxx.
Are you sure you want to continue connecting (yes/no)?
That message means the client has no record of this server’s public key. You are being asked to manually verify that the fingerprint matches what you expect. In practice, most people type “yes” without checking, which is a trust-on-first-use (TOFU) model. Not ideal, but pragmatic.
Once you accept, the server’s public key is stored in ~/.ssh/known_hosts. On subsequent connections, the client checks the server’s key against this stored value. If it does not match, you get a scary warning about a potential man-in-the-middle attack. Pay attention to that warning. It means either the server was rebuilt with new keys (common) or someone is intercepting your connection (less common but much more dangerous).
For environments where TOFU is not acceptable (and any serious production environment qualifies), you should distribute host keys through trusted channels. SSHFP DNS records (signed with DNSSEC), configuration management tools, or a host key certificate authority all solve this problem properly.
Step 4: User Authentication
Once the encrypted tunnel is established and the server’s identity is verified, it is time to prove who you are. SSH supports several authentication methods. The server’s configuration determines which methods are allowed.
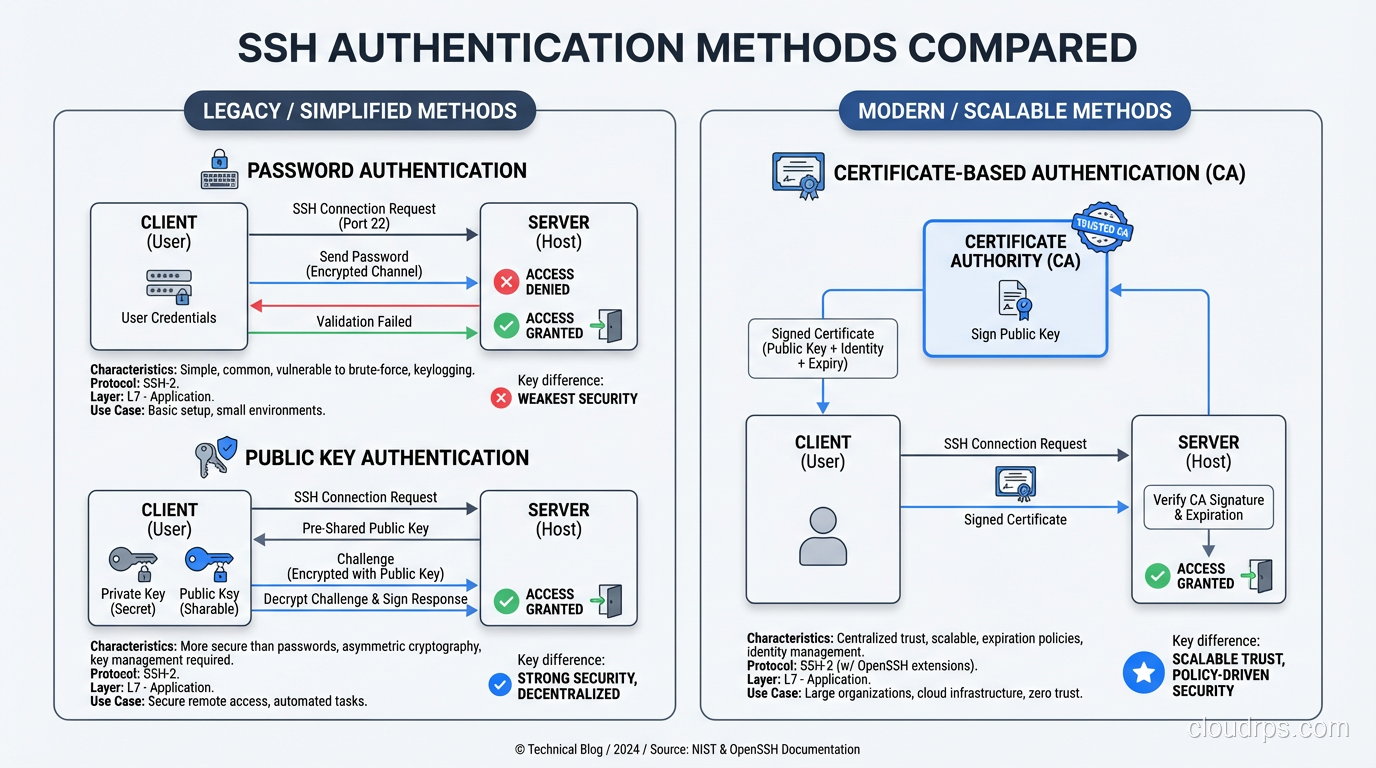
Password Authentication
The simplest method. The client sends your password through the encrypted tunnel to the server, which verifies it against its local authentication system (PAM, /etc/shadow, LDAP, etc.).
Password authentication is encrypted in transit (unlike Telnet), but it is still sending a reusable credential to the server. If the server is compromised, the attacker captures your password. For this reason, most security-conscious environments disable password authentication entirely and require key-based authentication.
Public Key Authentication
This is the gold standard for SSH authentication, and it is a beautiful application of asymmetric cryptography.
You generate a key pair: a private key that stays on your machine and a public key that gets installed on the server (in ~/.ssh/authorized_keys). When you connect:
- The client tells the server which public key it wants to use for authentication
- The server checks if that public key is in the user’s
authorized_keysfile - If found, the server sends a challenge, essentially random data encrypted with your public key
- The client proves it holds the private key by signing the challenge and sending the signature back
- The server verifies the signature against the public key
At no point does the private key leave your machine. At no point is any reusable credential transmitted to the server. Even if the server is completely compromised, the attacker cannot obtain your private key from the authentication exchange.
For key types, I strongly recommend Ed25519. It is fast, has small key sizes, and is resistant to several classes of implementation vulnerabilities that have affected other algorithms. Generate your keys with ssh-keygen -t ed25519.
Certificate-Based Authentication
For larger environments, managing authorized_keys files becomes unwieldy. SSH certificate authorities (CAs) solve this elegantly. Instead of distributing individual public keys to every server, you:
- Set up a CA (just an SSH key pair used for signing)
- Configure servers to trust that CA
- Sign user public keys with the CA, creating short-lived certificates
- Users authenticate with their certificate, which the server validates against the CA
This approach allows centralized access management, time-limited credentials, and easy revocation. If you are managing more than a dozen servers, you should be using certificates.

Step 5: The Connection Layer
Once authentication succeeds, the connection layer takes over. This is where SSH becomes more than just a remote shell. It is a multiplexed, encrypted tunnel that can carry multiple logical channels simultaneously.
Shell Sessions
The most common use: you get an interactive shell on the remote server. The client requests a pseudo-terminal (PTY), the server allocates one, starts your shell, and your keystrokes and the shell’s output flow through the encrypted channel.
File Transfer (SFTP and SCP)
SFTP (SSH File Transfer Protocol) and SCP (Secure Copy) both run over the SSH connection layer. SFTP is the modern choice because it is a full file transfer protocol with directory listing, resume support, and proper error handling. SCP is simpler but is being deprecated in newer OpenSSH versions due to protocol-level vulnerabilities.
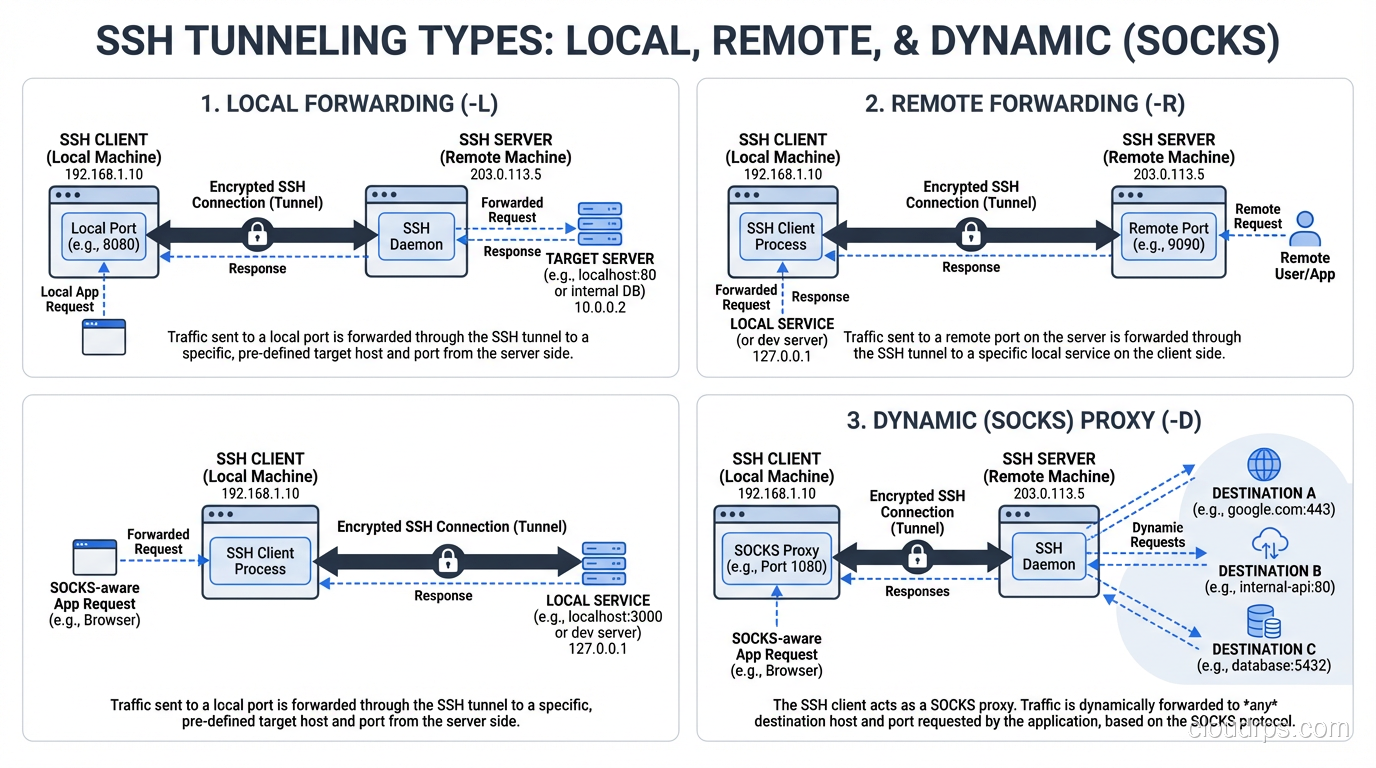
Port Forwarding (Tunneling)
This is where SSH’s versatility really shines, and it is one of the most underutilized features I encounter.
Local port forwarding (ssh -L 8080:database:5432 bastion) binds a port on your local machine and forwards traffic through the SSH tunnel to a destination reachable from the remote server. In this example, connecting to localhost:8080 on your machine sends traffic through the SSH tunnel to database:5432 on the remote network. This is how you securely access a database behind a firewall without exposing it to the internet.
Remote port forwarding (ssh -R 8080:localhost:3000 server) does the reverse. It binds a port on the remote server and forwards traffic back through the tunnel to your local machine. Useful for making a local development server temporarily accessible from the remote network.
Dynamic port forwarding (ssh -D 1080 server) creates a SOCKS proxy through the SSH tunnel. Any application that supports SOCKS proxying can route its traffic through the tunnel. I have used this countless times to securely browse internal web applications from remote locations.
If you are managing access to servers through bastion hosts or jump boxes, SSH tunneling is the mechanism that makes it all work. The ProxyJump directive in modern OpenSSH makes chaining through bastion hosts seamless.
SSH Configuration Best Practices
After decades of managing SSH infrastructure, here is what I consider essential configuration for any production environment.
Server Configuration (/etc/ssh/sshd_config)
Disable password authentication:
PasswordAuthentication no
Disable root login:
PermitRootLogin no
Restrict to modern algorithms:
KexAlgorithms curve25519-sha256,curve25519-sha256@libssh.org
HostKeyAlgorithms ssh-ed25519
Ciphers chacha20-poly1305@openssh.com,aes256-gcm@openssh.com
MACs hmac-sha2-256-etm@openssh.com,hmac-sha2-512-etm@openssh.com
Set idle timeout:
ClientAliveInterval 300
ClientAliveCountMax 2
Client Configuration (~/.ssh/config)
Use the Host directive to configure per-host settings:
Host production-*
    User deploy
    IdentityFile ~/.ssh/id_ed25519_prod
    ProxyJump bastion.example.com
    ForwardAgent no
Never enable ForwardAgent globally. Agent forwarding exposes your private key’s signing capability to the remote server. If that server is compromised, an attacker can use your forwarded agent to authenticate to other servers. Use ProxyJump instead.
How SSH Compares to TLS
SSH and TLS solve similar problems but are designed for different contexts. Both establish encrypted channels using key exchange and symmetric encryption. Both authenticate at least one party (the server). Both provide integrity protection.
The key differences:
Trust model: TLS relies on certificate authorities, a hierarchical trust model where you trust certain CAs to vouch for server identities. SSH defaults to trust-on-first-use, where you verify the server’s key yourself (or use SSH certificates, which is more analogous to TLS’s CA model).
Authentication: TLS authenticates the server by default and optionally the client (via client certificates). SSH authenticates both the server (via host keys) and the user (via password, public key, or certificate).
Use case: TLS is designed for client-server web traffic, API calls, and general-purpose transport security. SSH is designed for interactive remote access, file transfer, and tunneling.
Protocol overhead: SSH is more efficient for interactive sessions with small, frequent packets. TLS is optimized for bulk data transfer.
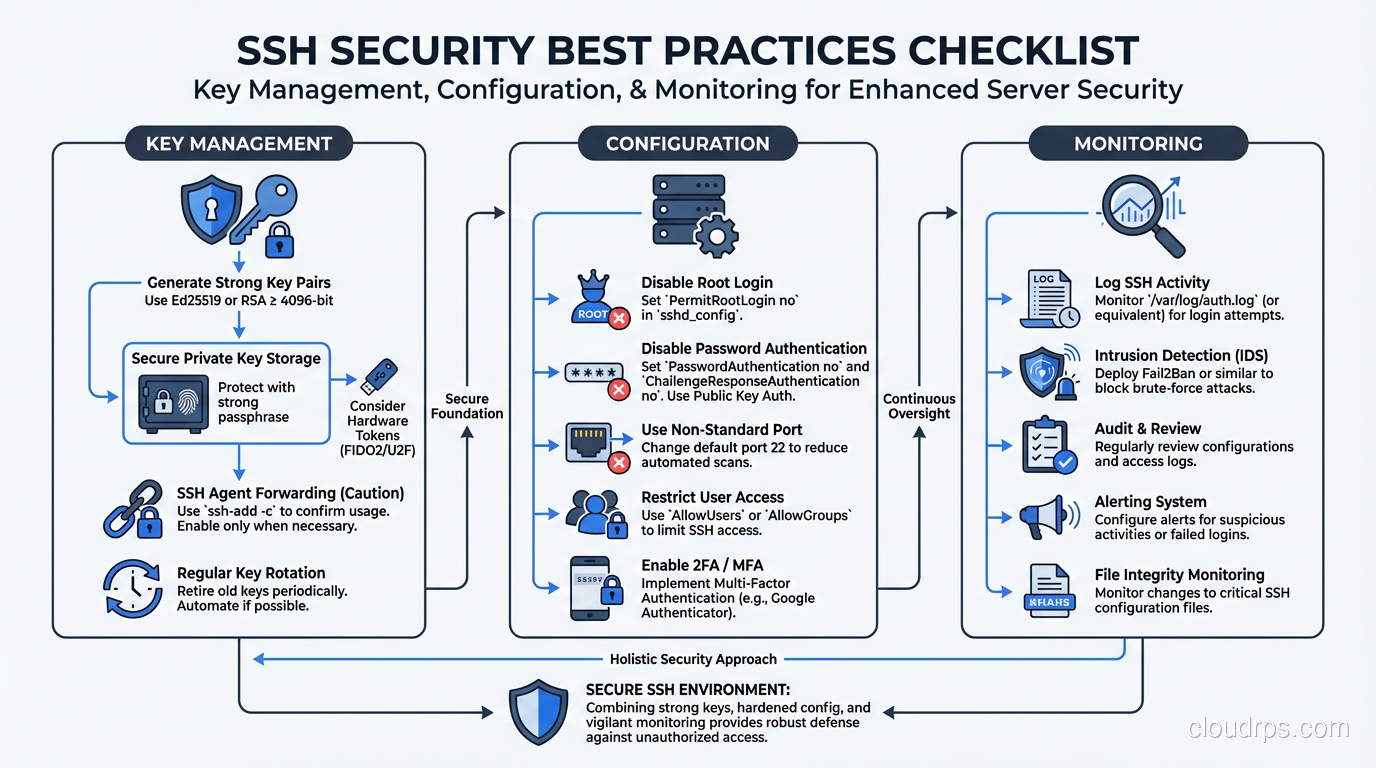
Security Considerations
Key Management
Your SSH private keys are critical secrets. Protect them accordingly:
- Use a strong passphrase on private keys (Ed25519 keys encrypted with AES-256)
- Use an SSH agent to avoid typing your passphrase repeatedly, but limit agent lifetime
- Rotate keys periodically, especially when team members leave
- Use hardware security keys (FIDO2/U2F) for the highest security. OpenSSH 8.2+ supports this natively
Monitoring and Auditing
SSH sessions should be logged and monitored. At minimum:
- Log authentication attempts (successful and failed)
- Log session start and end times
- For privileged access, record full session transcripts
- Alert on authentication from unexpected locations or at unusual times
- Monitor for unauthorized SSH tunnels that could be used for data exfiltration
The Agent Forwarding Trap
I mentioned this above but it bears repeating because I have seen it cause real security incidents. SSH agent forwarding (ForwardAgent yes) is convenient but dangerous. When you forward your agent to a remote server, anyone with root access on that server can use your agent to authenticate as you to any other server your keys grant access to.
Use ProxyJump for multi-hop access instead. It achieves the same result (reaching servers behind bastions) without exposing your agent to intermediate hosts.
Wrapping Up
SSH is more than a remote shell tool. It is a complete secure communications protocol with key exchange providing forward secrecy, multiple authentication methods offering flexibility and security, and a multiplexed connection layer supporting shells, file transfers, and tunneling.
Understanding how it works under the hood makes you a better operator. You will know why that host key warning matters. You will understand why agent forwarding is risky. You will be able to configure SSH properly rather than copying Stack Overflow snippets and hoping for the best.
If you want to dive deeper into the cryptographic foundations, start with symmetric vs asymmetric encryption. If you are interested in how a similar protocol secures web traffic, read about how TLS works. And if you want to understand the broader context of secure remote access, check out bastion hosts and jump boxes.
Get Cloud Architecture Insights
Practical deep dives on infrastructure, security, and scaling. No spam, no fluff.
By subscribing, you agree to receive emails. Unsubscribe anytime.