I spent the better part of a year fighting the Kubernetes Cluster Autoscaler. The delays were maddening. A burst of traffic would hit, pods would sit in Pending state for three to five minutes while the autoscaler slowly realized it needed to add nodes, convinced the cloud provider to spin them up, waited for them to join the cluster, and then finally let the pods run. By the time the infrastructure responded, the burst was half over and users had already hit errors. Switching to Karpenter was the single biggest operational improvement I made to that cluster.
This piece covers what Karpenter actually is, how it differs from the Cluster Autoscaler, how to configure it well, and where it falls short. The Kubernetes autoscaling story for pod-level scaling with HPA/VPA is solid, but node provisioning is where teams consistently leave money and performance on the table.
What the Cluster Autoscaler Gets Wrong
The Kubernetes Cluster Autoscaler has been the standard node-level autoscaling solution since the early days. It works by monitoring pending pods, determining if a new node in an existing node group would allow those pods to schedule, and then asking the cloud provider to add a node to that group.
The fundamental problem is that it operates on pre-defined node groups. You configure an autoscaling group (ASG in AWS), pick an instance type, set min/max counts, and the CAS scales within those bounds. If you need multiple instance types for cost optimization, you need multiple node groups. If you want to mix spot and on-demand, more node groups. Large clusters end up with fifteen to twenty node groups and a CAS configuration that looks like a nested spreadsheet.
The scale-up latency compounds this problem. The CAS has to poll the API server for pending pods, evaluate whether they could fit on a new node, confirm the decision with its simulation, then trigger the cloud provider API, then wait for the node to boot, join the cluster, pass readiness checks, and finally become schedulable. On AWS, that chain takes four to seven minutes in normal conditions. With cold AMIs or complex node initialization scripts, longer.
Scale-down is similarly conservative. The CAS waits ten minutes by default before considering a node for removal, checks whether all its pods can be rescheduled elsewhere, and only then terminates it. This caution is warranted, but it means you’re paying for idle capacity longer than you should be.
How Karpenter Works Differently
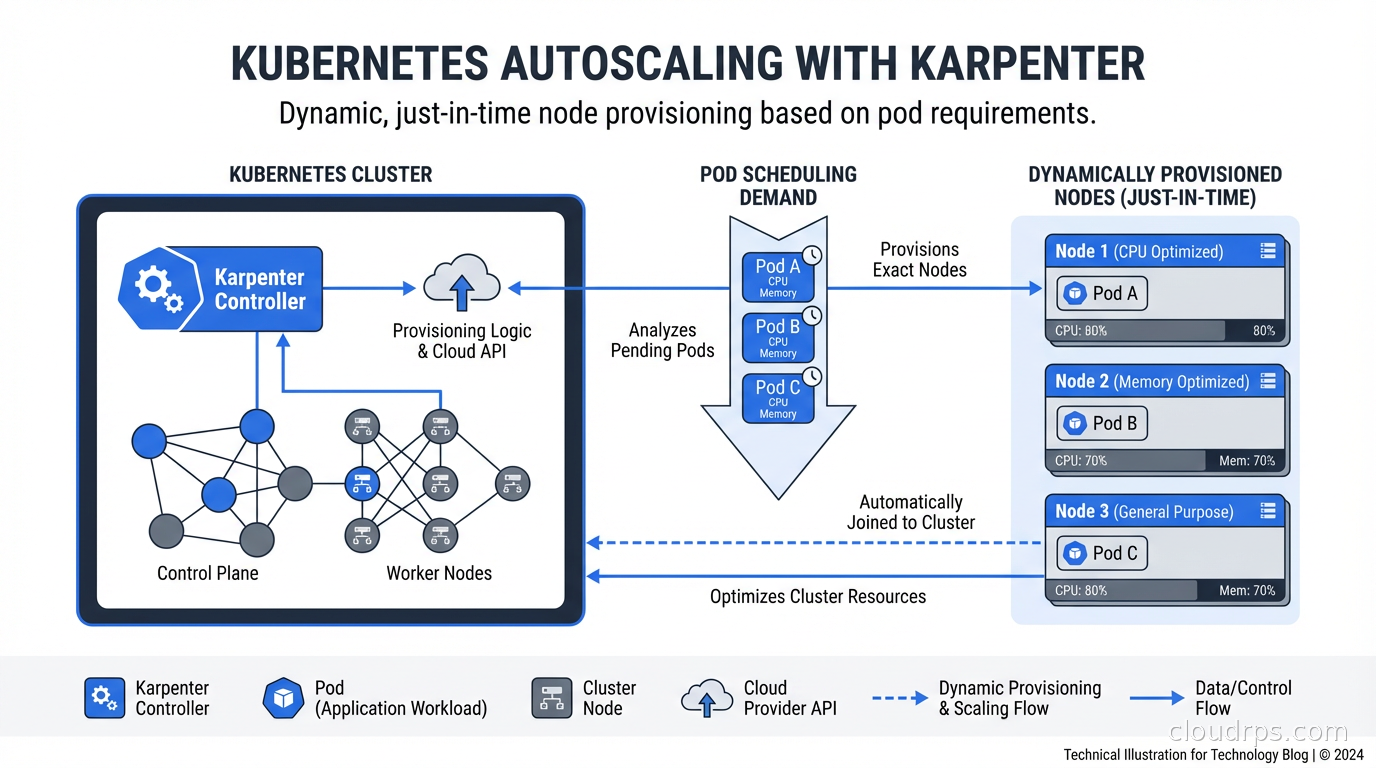
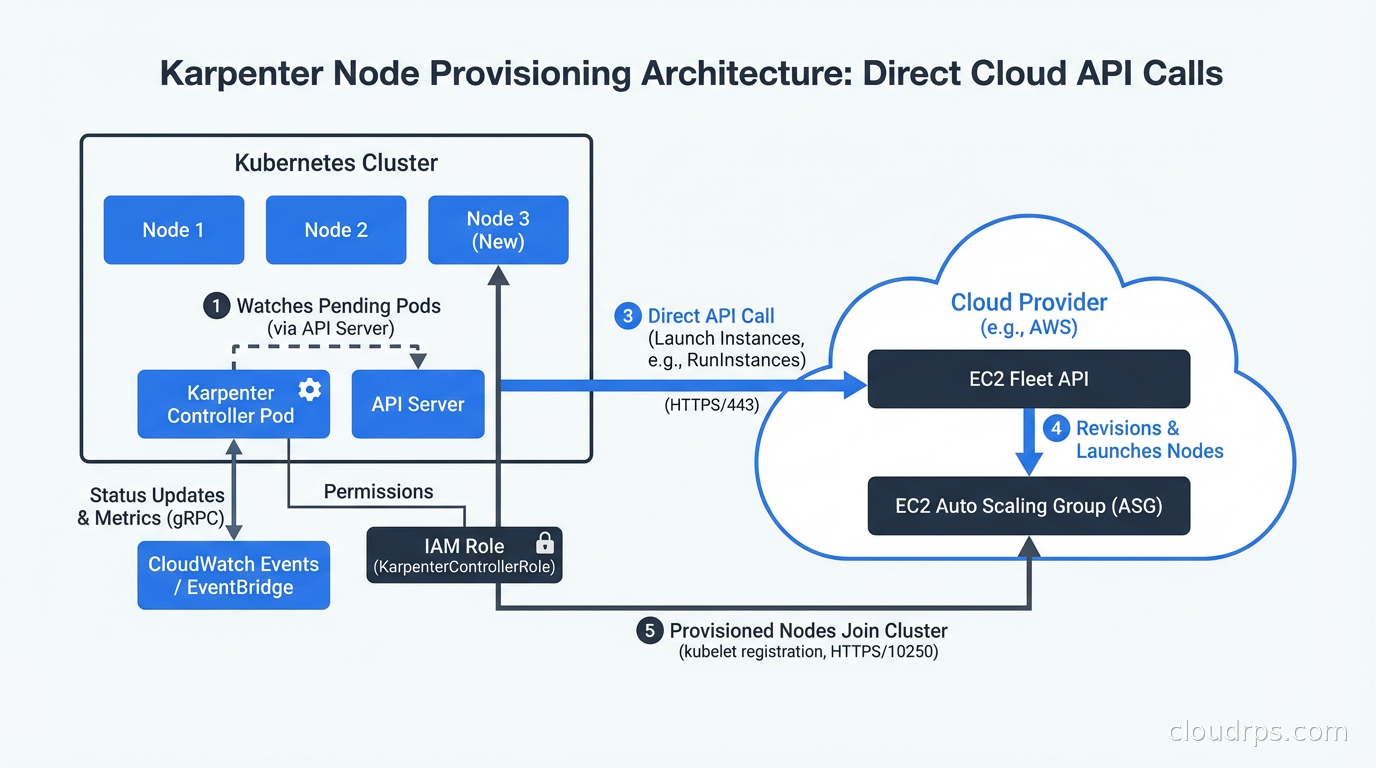
Karpenter takes a fundamentally different approach. Instead of scaling pre-defined node groups, it watches for unschedulable pods and directly calls the cloud provider API to provision exactly the right node for those pods. No node groups required.
When a pod becomes pending, Karpenter reads its resource requests, node selectors, affinities, tolerations, and topology constraints. It then queries the cloud provider to find instance types that can satisfy all those requirements, picks the most cost-effective option, and launches that specific instance. Getting this right means understanding how Kubernetes scheduling constraints actually work at the scheduler level; our guide to Kubernetes pod scheduling, taints, tolerations, and topology spread constraints covers the mechanics that Karpenter respects when selecting nodes. The direct API call approach means Karpenter can provision a node in thirty to sixty seconds instead of four to seven minutes.
This direct provisioning also enables a crucial optimization: bin-packing. When multiple pods are pending simultaneously, Karpenter considers them together and chooses the smallest node type that can accommodate all of them. The Cluster Autoscaler considers pods independently and often over-provisions.
The second major capability is node consolidation. Karpenter continuously evaluates whether running nodes can be replaced with fewer or cheaper nodes by rescheduling their pods. If you have three nodes at 30% utilization that could be consolidated onto two nodes, Karpenter will do that automatically, politely draining and terminating the underutilized nodes. Over time, this removes the capacity creep that plagues long-running clusters.
NodePools and NodeClasses: The Configuration Model
Karpenter replaced its earlier CRDs (Provisioner) with a cleaner model in v0.33: NodePool and NodeClass (the cloud-specific resource, EC2NodeClass on AWS).
A NodePool defines the constraints for the nodes Karpenter can provision: which instance families, which architectures, which capacity types (spot vs on-demand), resource limits, and disruption behavior. Here is a realistic NodePool for a general-purpose workload:
apiVersion: karpenter.sh/v1
kind: NodePool
metadata:
  name: general
spec:
  template:
    metadata:
      labels:
        workload-type: general
    spec:
      nodeClassRef:
        group: karpenter.k8s.aws
        kind: EC2NodeClass
        name: default
      requirements:
        - key: karpenter.k8s.aws/instance-category
          operator: In
          values: ["c", "m", "r"]
        - key: karpenter.k8s.aws/instance-generation
          operator: Gt
          values: ["2"]
        - key: kubernetes.io/arch
          operator: In
          values: ["amd64", "arm64"]
        - key: karpenter.sh/capacity-type
          operator: In
          values: ["spot", "on-demand"]
  limits:
    cpu: 1000
    memory: 2000Gi
  disruption:
    consolidationPolicy: WhenUnderutilized
    consolidateAfter: 1m
The EC2NodeClass specifies the AMI family, subnets, security groups, and instance profile:
apiVersion: karpenter.k8s.aws/v1
kind: EC2NodeClass
metadata:
  name: default
spec:
  amiFamily: AL2023
  role: "KarpenterNodeRole-my-cluster"
  subnetSelectorTerms:
    - tags:
        karpenter.sh/discovery: "my-cluster"
  securityGroupSelectorTerms:
    - tags:
        karpenter.sh/discovery: "my-cluster"
  tags:
    Name: karpenter-node
    ManagedBy: karpenter
Multiple NodePools let you separate workloads with different requirements: a GPU NodePool for ML workloads, a high-memory NodePool for database-adjacent processing, a spot-only NodePool for batch jobs, and a dedicated NodePool for CI runner pods. That last one is particularly valuable for teams using GitHub Actions self-hosted runners with ARC: Karpenter provisions runner nodes on demand when jobs are queued and terminates them when the queue is empty, turning CI compute into a true pay-per-build cost model. Pods get matched to NodePools through node selectors and the NodePool’s requirements constraints.
Spot Instance Integration: Where the Cost Savings Come From
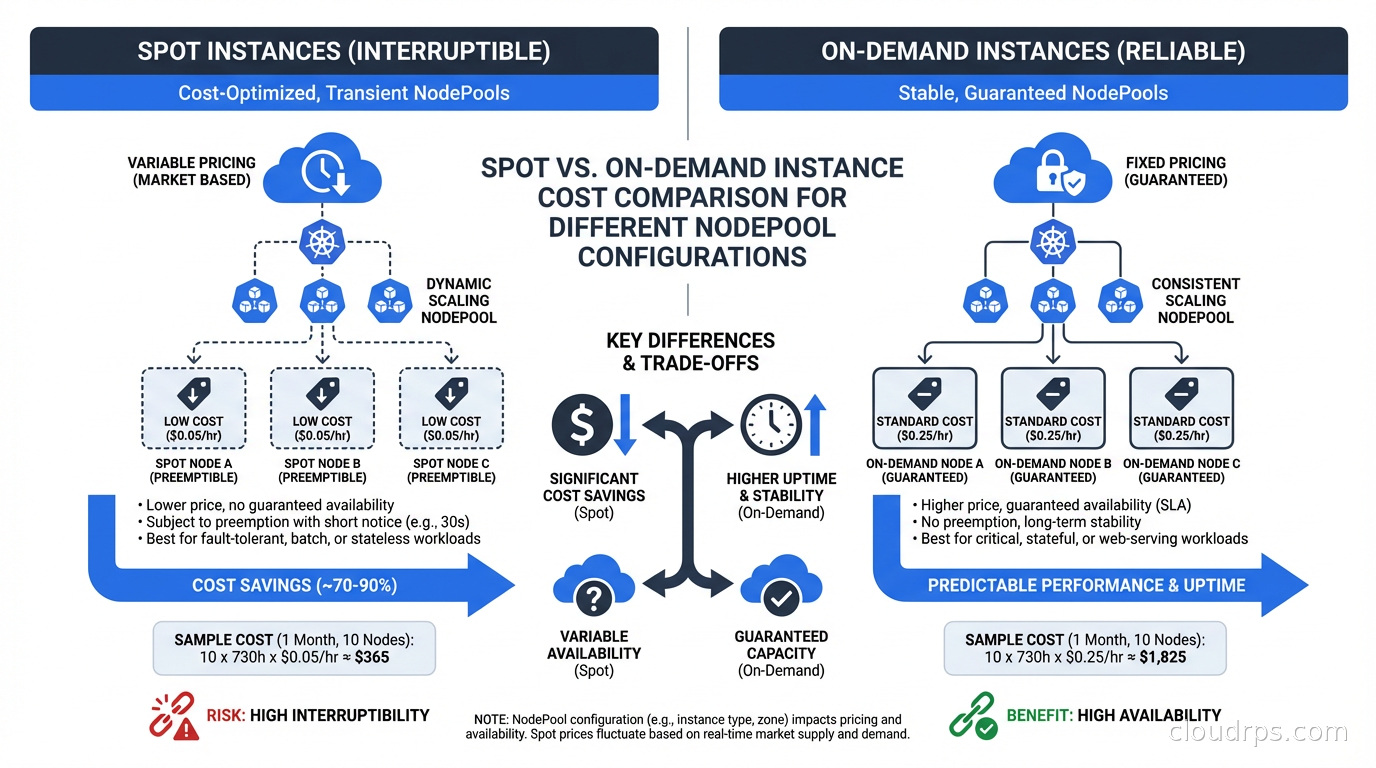
Spot instances are where Karpenter really shines for cost optimization. The Cluster Autoscaler supports spot through managed node groups with multiple instance type overrides, but the configuration is clunky and the interruption handling is basic.
Karpenter integrates with EC2 Spot Interruption Warnings natively. When AWS signals a spot interruption, Karpenter immediately starts draining the affected node and provisioning a replacement, reducing the disruption window from the two-minute interruption notice to as short as thirty seconds in practice.
The instance type flexibility is key to spot reliability. If you constrain a NodePool to only c5.xlarge spot, you will get frequent interruptions when that specific capacity pool is reclaimed. If you allow c5.xlarge, c5a.xlarge, c6i.xlarge, m5.xlarge, and m6i.xlarge, Karpenter can move between pools and find available capacity. I typically open up two to three instance families with two to four sizes each for general workloads, which keeps spot interruption rates below 5% in most regions.
The cost impact is substantial. A typical EKS cluster with Karpenter on a mixed spot/on-demand strategy sees 60-70% lower compute costs compared to pure on-demand. This is one of the highest-ROI FinOps improvements available for Kubernetes workloads, and it pairs well with understanding your total cloud costs to see the full picture. To see precisely which namespaces and deployments benefit from Karpenter’s consolidation and where residual waste remains, add OpenCost or Kubecost for pod-level cost attribution alongside Karpenter. For a deeper look at spot market mechanics, interruption rates, and the same patterns applied outside Kubernetes, see our guide to spot instances and preemptible VMs.
Disruption Policies: Controlling When Nodes Are Replaced
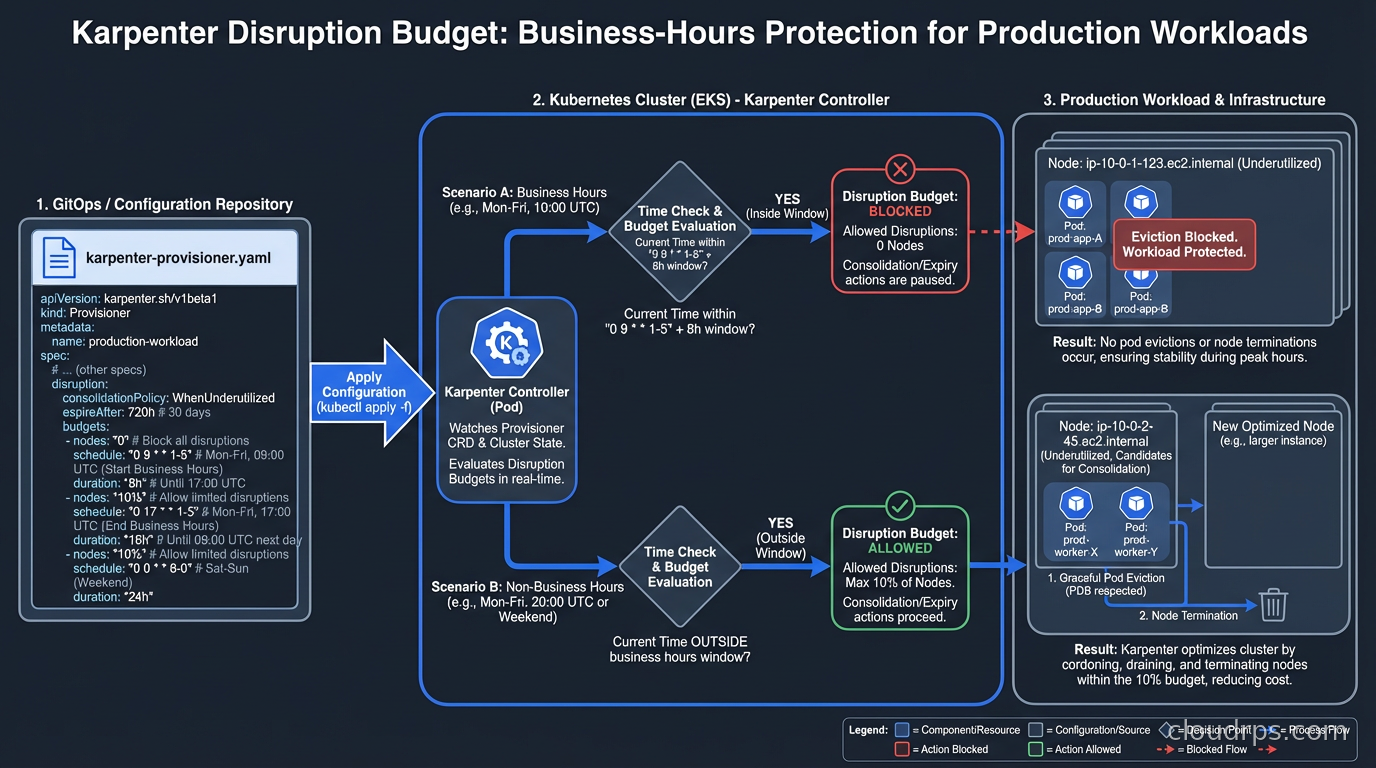
Consolidation is powerful but needs careful configuration for production workloads. Karpenter’s disruption policies control when and how nodes are drained and terminated.
consolidationPolicy: WhenUnderutilized tells Karpenter to consolidate nodes that have low utilization. consolidateAfter sets how long a node must be underutilized before Karpenter acts on it. For batch workloads, you can set this to 1m or 30s. For workloads with slower recovery times, 5-10 minutes is safer.
The disruption.budgets field lets you set how many nodes can be disrupted simultaneously. This is critical for production clusters where you need to avoid consolidating too aggressively during business hours:
disruption:
  consolidationPolicy: WhenUnderutilized
  consolidateAfter: 2m
  budgets:
    - nodes: "20%"
    - schedule: "0 9 * * mon-fri"
      duration: 8h
      nodes: "0"
This example allows normal consolidation outside business hours, but during the 9am to 5pm window on weekdays, no consolidation happens at all. I use similar patterns for clusters that run latency-sensitive workloads, where the disruption from pod rescheduling is noticeable to end users.
For workloads that cannot tolerate interruption, karpenter.sh/do-not-disrupt: "true" as a pod annotation prevents Karpenter from consolidating any node running that pod. Use this for stateful workloads, long-running batch jobs, or anything with expensive startup costs.
Karpenter vs Cluster Autoscaler: When to Use Which
Karpenter is not the right choice in every situation. Here is an honest comparison.
Use Karpenter when:
- You are on AWS EKS and want maximum flexibility and speed
- You have diverse workloads with different instance type requirements
- Spot instance cost optimization is a priority
- You want automated consolidation to eliminate idle capacity
- You are starting a new cluster and do not have CAS history to worry about
Stick with Cluster Autoscaler when:
- You are on GKE or AKS and using their managed autoscaling (GKE Autopilot, AKS Node Auto Provisioning). For a detailed look at how GKE Autopilot and AKS Node Auto Provisioning compare to the EKS-Karpenter combination, see the EKS vs GKE vs AKS platform comparison.
- You have strict compliance requirements around specific instance types
- Your team is already invested deeply in CAS configuration and the migration cost is not worth it
- You are running on-premises with a Cluster API (CAPI) provider where Karpenter support is still maturing (CAPI handles cluster lifecycle; Karpenter handles node scaling within running clusters and the two are complementary, not competing)
Karpenter’s cloud provider support is still expanding. The AWS provider is production-grade. The Azure provider is in active development. GCP support exists but is less mature than AWS. If you are on a non-AWS cloud, check the current provider status before committing.
Integrating with Kubernetes Operators and Platform Engineering
In clusters using Kubernetes Operators for stateful workloads, Karpenter requires coordination. Operators often expect nodes with specific labels, taints, or storage configurations. Make sure your NodePools and EC2NodeClasses correctly configure the labels and taints that your operators depend on, and use nodeSelector or nodeAffinity in your operator-managed pods to ensure they land on the right nodes.
For teams building internal developer platforms, Karpenter NodePools map cleanly to the infrastructure abstraction you want to expose to developers. A “compute” NodePool for general apps, a “gpu” NodePool for ML workloads, a “batch” NodePool for non-critical jobs. Developers specify which pool they need via node selectors without having to know anything about instance types or ASG configuration. This pairs particularly well with KubeRay for distributed ML training: the Ray Autoscaler scales worker pods up and down based on pending task demand, and Karpenter handles node provisioning and deprovisioning underneath, so you get true end-to-end autoscaling from the Ray task queue to the cloud node.
Running Databases on Karpenter-Managed Nodes
If you are running databases on Kubernetes, Karpenter’s consolidation behavior needs careful attention. A database pod that gets its node consolidated and rescheduled will have a brief unavailability window. Use the karpenter.sh/do-not-disrupt: "true" annotation on database pods, or run your databases on a dedicated NodePool with consolidationPolicy: WhenEmpty (only consolidates completely empty nodes) rather than WhenUnderutilized.
For stateful workloads with PersistentVolumes, ensure your NodePool constrains nodes to the same availability zone as the PV. Use topologySpreadConstraints or volumeNodeAffinity to keep pods and their storage together. Karpenter respects these constraints but you have to configure them. Topology-aware scheduling also has a direct impact on your cloud bill beyond compute: cross-AZ traffic carries data transfer charges, so keeping pods and their dependencies in the same AZ reduces both latency and networking costs. Our cloud egress costs guide covers how to model and minimize these charges across your entire architecture.
Observability and Debugging
Karpenter exposes rich metrics via Prometheus. The key metrics to watch:
karpenter_nodes_created_totalandkarpenter_nodes_terminated_total: Node lifecycle rateskarpenter_pods_startup_duration_seconds: How long pods wait from pending to runningkarpenter_provisioner_scheduling_simulation_duration_seconds: Scheduling decision latencykarpenter_disruption_replacement_node_launched_total: Consolidation activity
Karpenter’s logs are verbose and useful. Increasing the log level to debug during initial setup shows exactly which NodePool was chosen for each pod, which instance types were evaluated, and why certain options were rejected.
The most common issue I see teams hit is insufficient IAM permissions. Karpenter needs EC2 permissions to launch, describe, and terminate instances, plus permissions to use the instance profile it assigns to nodes. The official documentation provides the exact IAM policy, but teams often copy it partially or modify it in ways that cause subtle failures.
The Migration Path from Cluster Autoscaler
I have migrated three clusters from CAS to Karpenter. The safest approach is parallel operation: install Karpenter, create a NodePool that does not overlap with your CAS node groups (use a different label), and move workloads to Karpenter-managed nodes gradually. Once you are confident, scale down the CAS node groups to minimum and let Karpenter handle new demand.
Do not do a big-bang cutover. Run both side by side for a week, watch the metrics, validate that consolidation is not disrupting your workloads, then complete the transition. The parallel operation period also gives you a chance to tune your NodePool configurations with real workload data before fully committing.
The Kubernetes networking piece is worth checking during migration too. If you use CNI plugins like Calico or Cilium with custom configurations, verify that Karpenter-provisioned nodes pick up the right CNI configuration and network policies apply correctly. This is usually seamless but has burned teams who assumed it would work without verification.
Karpenter is the right answer for most AWS EKS clusters running today. The scaling speed, spot integration, and automated consolidation deliver real, measurable improvements in both performance and cost. The configuration model is cleaner than node groups, and the ongoing maintenance burden is lower once you understand the NodePool abstraction. Give it a proper evaluation before assuming the Cluster Autoscaler is good enough.
If you’re still deciding whether to run Kubernetes at all versus a managed platform like ECS Fargate or Cloud Run, the serverless containers vs Kubernetes comparison covers that decision before you get to the Karpenter question.
Get Cloud Architecture Insights
Practical deep dives on infrastructure, security, and scaling. No spam, no fluff.
By subscribing, you agree to receive emails. Unsubscribe anytime.