Kubernetes autoscaling sounds simple on paper. Traffic goes up, pods scale out. Traffic goes down, pods scale in. Easy, right?
I used to think so too. Then I watched a production e-commerce platform crash on Black Friday because the Horizontal Pod Autoscaler was configured to scale on CPU, but the actual bottleneck was a downstream message queue filling up. The pods were barely using 30% CPU while requests piled up and timed out. The autoscaler sat there, perfectly content, doing absolutely nothing.
That incident cost real money and taught me a fundamental lesson: Kubernetes gives you four distinct autoscaling mechanisms, each solving a different problem. Using the wrong one (or misconfiguring the right one) is worse than not autoscaling at all, because it gives you a false sense of safety.
In this guide, I’m going to walk through all four autoscalers, when and how to use each, and the mistakes I’ve seen teams make repeatedly. If you’re already comfortable with the basics of Kubernetes and container orchestration, this will take your operational maturity up a notch.
Why Autoscaling Is Harder Than It Sounds
Before diving into the mechanics, let’s be honest about why autoscaling trips people up. The core challenge is that scaling a web application isn’t just about adding capacity. It’s about adding the right kind of capacity at the right time based on the right signal.
Here’s what makes it hard:
Metric lag. By the time your monitoring system detects a spike, reports it to the metrics server, and the autoscaler makes a decision, 60 to 90 seconds have already passed. That’s an eternity during a traffic spike.
Cold start overhead. A new pod doesn’t serve traffic instantly. It needs to pull the image (if not cached), run init containers, pass readiness probes, and warm up connections. I’ve seen Java applications take 45 seconds from pod creation to first request served.
Resource interdependencies. Your API server might need more CPU, but the database connection pool is already maxed out. Scaling pods without scaling the backend resources they depend on just shifts the bottleneck.
Cost implications. Aggressive autoscaling burns money. Conservative autoscaling drops requests. Getting the balance right is an ongoing process, not a one-time configuration. This is exactly why FinOps practices matter for any team running Kubernetes at scale.
Horizontal Pod Autoscaler (HPA): The Workhorse
The HPA is the autoscaler most teams start with, and for good reason. It adds or removes pod replicas based on observed metrics. More load means more pods. Simple concept, nuanced execution.

How HPA Actually Works
The HPA controller runs a control loop every 15 seconds (configurable via --horizontal-pod-autoscaler-sync-period). Each cycle, it:
- Queries the metrics API for the target metric (CPU, memory, or custom metrics)
- Calculates the desired replica count using the formula:
desiredReplicas = ceil(currentReplicas * (currentMetricValue / desiredMetricValue)) - Applies scaling policies to determine how fast to scale up or down
- Updates the deployment’s replica count
Here’s a production-ready HPA configuration that goes beyond the basic CPU example you see in every tutorial:
apiVersion: autoscaling/v2
kind: HorizontalPodAutoscaler
metadata:
  name: api-server-hpa
  namespace: production
spec:
  scaleTargetRef:
    apiVersion: apps/v1
    kind: Deployment
    name: api-server
  minReplicas: 3
  maxReplicas: 50
  metrics:
  - type: Resource
    resource:
      name: cpu
      target:
        type: Utilization
        averageUtilization: 65
  - type: Pods
    pods:
      metric:
        name: http_requests_per_second
      target:
        type: AverageValue
        averageValue: "1000"
  behavior:
    scaleUp:
      stabilizationWindowSeconds: 30
      policies:
      - type: Percent
        value: 100
        periodSeconds: 60
      - type: Pods
        value: 10
        periodSeconds: 60
      selectPolicy: Max
    scaleDown:
      stabilizationWindowSeconds: 300
      policies:
      - type: Percent
        value: 10
        periodSeconds: 60
      selectPolicy: Min
A few things worth highlighting in this config. First, I’m using two metrics simultaneously. The HPA will scale to whichever metric demands more replicas. This is crucial because CPU alone misses I/O-bound workloads.
Second, notice the asymmetric scaling behavior. Scale-up is aggressive (double every 60 seconds if needed), but scale-down is conservative (only 10% reduction per minute, with a 5-minute stabilization window). This prevents the thrashing problem where pods scale down too fast and immediately need to scale back up.
Third, minReplicas: 3 ensures you always have enough pods for high availability across availability zones.
Custom Metrics: Where HPA Gets Powerful
The default CPU/memory metrics are a starting point, but production workloads almost always need custom metrics. To use them, you need a metrics pipeline:
- Your application exposes metrics (typically via Prometheus)
- Prometheus scrapes and stores them
- A Prometheus adapter translates them into the Kubernetes custom metrics API
- The HPA reads from that API
The metrics you choose matter enormously. Good HPA metrics are:
- Directly correlated with load (requests per second, queue depth, active connections)
- Fast-moving (not aggregated over long windows)
- Per-pod meaningful (the HPA divides by replica count)
Bad HPA metrics include things like error rate (scaling up doesn’t fix errors), downstream latency (scaling your pods won’t speed up the database), and business metrics that don’t correlate linearly with pod count.
Vertical Pod Autoscaler (VPA): Right-Sizing Your Pods
While HPA adjusts the number of pods, VPA adjusts the resource requests and limits of individual pods. Think of it as automatic right-sizing.
Here’s the thing about VPA that surprises most people: it’s not primarily a scaling tool. It’s a resource optimization tool. VPA watches your pods’ actual CPU and memory usage over time, then adjusts the requests to match what the workload actually needs.
Why VPA Matters
Most teams set resource requests during initial deployment and never touch them again. I’ve audited clusters where some pods were requesting 2 CPU cores but using 200m, while others were requesting 256Mi of memory but getting OOM-killed regularly because they actually needed 1Gi.
This matters because the Kubernetes scheduler uses requests (not actual usage) to make placement decisions. Over-requesting wastes cluster capacity. Under-requesting causes evictions and instability.
Here’s a VPA configuration:
apiVersion: autoscaling.k8s.io/v1
kind: VerticalPodAutoscaler
metadata:
  name: batch-processor-vpa
  namespace: production
spec:
  targetRef:
    apiVersion: apps/v1
    kind: Deployment
    name: batch-processor
  updatePolicy:
    updateMode: "Auto"
  resourcePolicy:
    containerPolicies:
    - containerName: processor
      minAllowed:
        cpu: "100m"
        memory: "128Mi"
      maxAllowed:
        cpu: "4"
        memory: "8Gi"
      controlledResources: ["cpu", "memory"]
      controlledValues: RequestsOnly
VPA Update Modes
VPA has three modes, and choosing the right one matters:
- Off: VPA calculates recommendations but doesn’t apply them. Use this initially to see what VPA would do before trusting it.
- Initial: VPA sets resource requests only when pods are created. Running pods aren’t modified. This is the safest “active” mode.
- Auto: VPA evicts and recreates pods to apply new resource requests. This is powerful but disruptive, since it literally restarts your pods.
The Auto mode is where I see the most problems. VPA will evict pods to right-size them, and if your application doesn’t handle graceful restarts well, or if you don’t have enough replicas to absorb the disruption, you’ll have outages. Always combine VPA Auto mode with Pod Disruption Budgets.
The HPA and VPA Conflict
Here’s the critical gotcha: you should not use HPA and VPA on the same metric. If HPA is scaling based on CPU and VPA is also adjusting CPU requests, they’ll fight each other. HPA says “we need more pods because CPU is high.” VPA says “actually, let me give each pod more CPU instead.” The result is unpredictable oscillation.
The safe pattern is: use HPA for scaling based on custom metrics (like requests per second) and VPA for right-sizing resource requests. Or use HPA on CPU and VPA in recommendation-only mode, applying its suggestions during your next deployment.
KEDA: Event-Driven Autoscaling
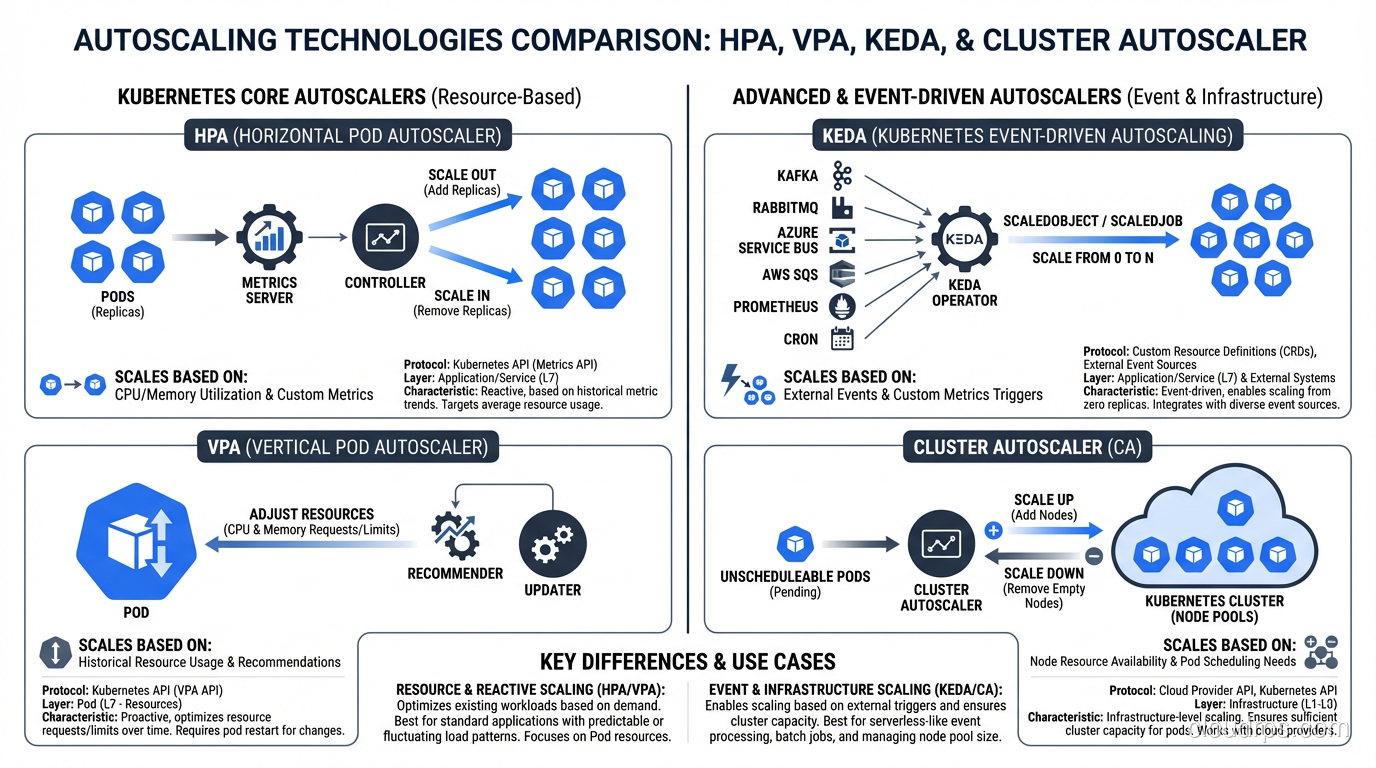
KEDA (Kubernetes Event-Driven Autoscaling) is the most flexible autoscaler, and the one I reach for whenever HPA’s built-in metrics aren’t enough. KEDA extends the HPA with external event sources, called scalers.
Where HPA natively understands CPU, memory, and Kubernetes-native custom metrics, KEDA can scale based on virtually anything: AWS SQS queue depth, Kafka consumer lag, Prometheus queries, cron schedules, PostgreSQL query results, Azure Service Bus message count, and dozens more.
The Killer Feature: Scale to Zero
This is where KEDA really shines. HPA has a minimum replica count of 1 (well, technically you can set it to 0 with a feature gate, but it’s not the standard path). KEDA natively supports scaling to zero replicas and back up when events arrive.
For workloads that are bursty or event-driven, this is transformative. Think batch processors, webhook handlers, or queue consumers that only need to run when there’s work to do. This is conceptually similar to what serverless platforms provide, but within the Kubernetes ecosystem where you keep control over the runtime.
Here’s a KEDA configuration for scaling based on an AWS SQS queue:
apiVersion: keda.sh/v1alpha1
kind: ScaledObject
metadata:
  name: order-processor
  namespace: production
spec:
  scaleTargetRef:
    name: order-processor
  pollingInterval: 10
  cooldownPeriod: 300
  idleReplicaCount: 0
  minReplicaCount: 1
  maxReplicaCount: 30
  triggers:
  - type: aws-sqs-queue
    metadata:
      queueURL: https://sqs.us-east-1.amazonaws.com/123456789/orders
      queueLength: "5"
      awsRegion: us-east-1
    authenticationRef:
      name: aws-credentials
  - type: cron
    metadata:
      timezone: America/New_York
      start: "0 8 * * 1-5"
      end: "0 20 * * 1-5"
      desiredReplicas: "3"
This config does something clever: it primarily scales based on SQS queue depth (one pod per 5 messages), but it also has a cron trigger that ensures at least 3 replicas during business hours. Outside of business hours and when the queue is empty, it scales to zero. This kind of hybrid scaling is something pure HPA can’t do.
KEDA Architecture
Under the hood, KEDA works by creating and managing HPA objects. It doesn’t replace HPA; it extends it. KEDA has three components:
- Agent: monitors event sources and activates/deactivates deployments (handling the 0-to-1 and 1-to-0 transitions)
- Metrics Server: exposes external metrics to the HPA
- Admission Webhooks: validates ScaledObject configurations
This architecture means KEDA is additive. You can adopt it incrementally without replacing your existing HPA setup.
Cluster Autoscaler: The Node-Level Piece
Everything we’ve discussed so far scales pods. But pods need nodes to run on. If the scheduler can’t find a node with enough available resources for a new pod, that pod stays in Pending state. This is where the Cluster Autoscaler comes in.
The Cluster Autoscaler monitors for unschedulable pods and adds nodes to the cluster. It also removes underutilized nodes when their pods can be placed elsewhere. Understanding the difference between this kind of infrastructure scaling and application-level scaling is key to grasping scalability vs elasticity in practice.
How It Decides to Scale Up
The Cluster Autoscaler doesn’t look at aggregate metrics like “cluster CPU is at 80%.” Instead, it watches for specific pods that are unschedulable because of insufficient resources. When it finds one, it simulates scheduling against each node group to find the cheapest option that would allow the pod to run.
This is an important distinction. The Cluster Autoscaler is reactive to scheduling failures, not proactive based on utilization. This means there’s always a delay: the HPA creates a new pod, the pod goes Pending, the Cluster Autoscaler notices, it requests a new node from the cloud provider, the node boots and joins the cluster (2 to 5 minutes on most providers), and then the pod gets scheduled.
That 2-to-5-minute gap is real and painful. It’s why I always recommend:
- Over-provision slightly. Keep a buffer node or use priority-based preemption with low-priority “placeholder” pods that get evicted when real workloads need the space.
- Use multiple node groups. Have node groups with different instance types. The autoscaler will pick the cheapest one that fits.
- Set appropriate expanders. The expander strategy (random, most-pods, least-waste, price, priority) determines which node group to scale when multiple options work.
How It Decides to Scale Down
Scale-down is more conservative and nuanced. A node is considered for removal when:
- The sum of CPU and memory requests of all pods is below 50% of the node’s capacity (configurable)
- All pods on the node can be moved elsewhere
- No pods have local storage or restrictive PodDisruptionBudgets
- The node has been underutilized for at least 10 minutes (configurable)
The Cluster Autoscaler will not remove a node if doing so would violate a PodDisruptionBudget or if the node has pods with cluster-autoscaler.kubernetes.io/safe-to-evict: "false" annotations. Be careful with this annotation on stateful workloads like databases on Kubernetes; it can prevent scale-down entirely.
Making All Four Work Together
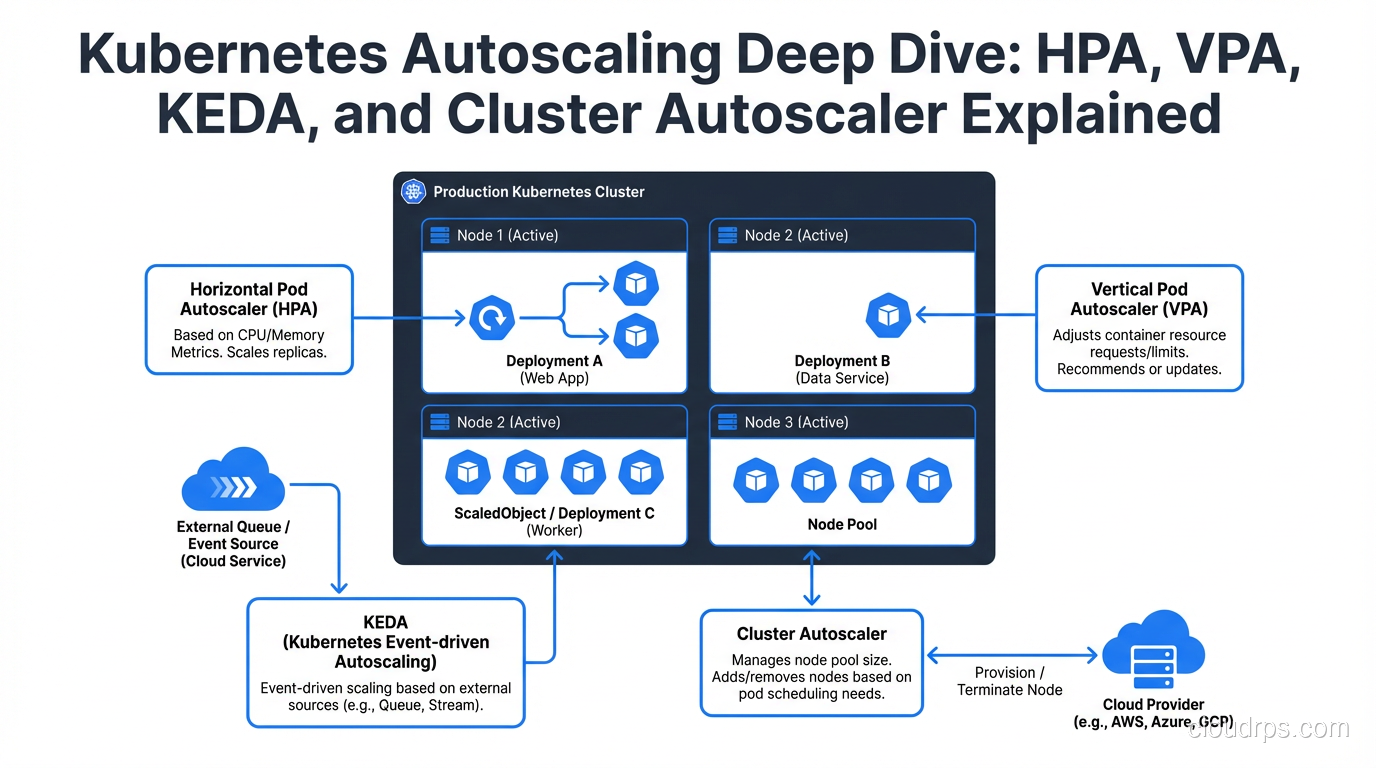
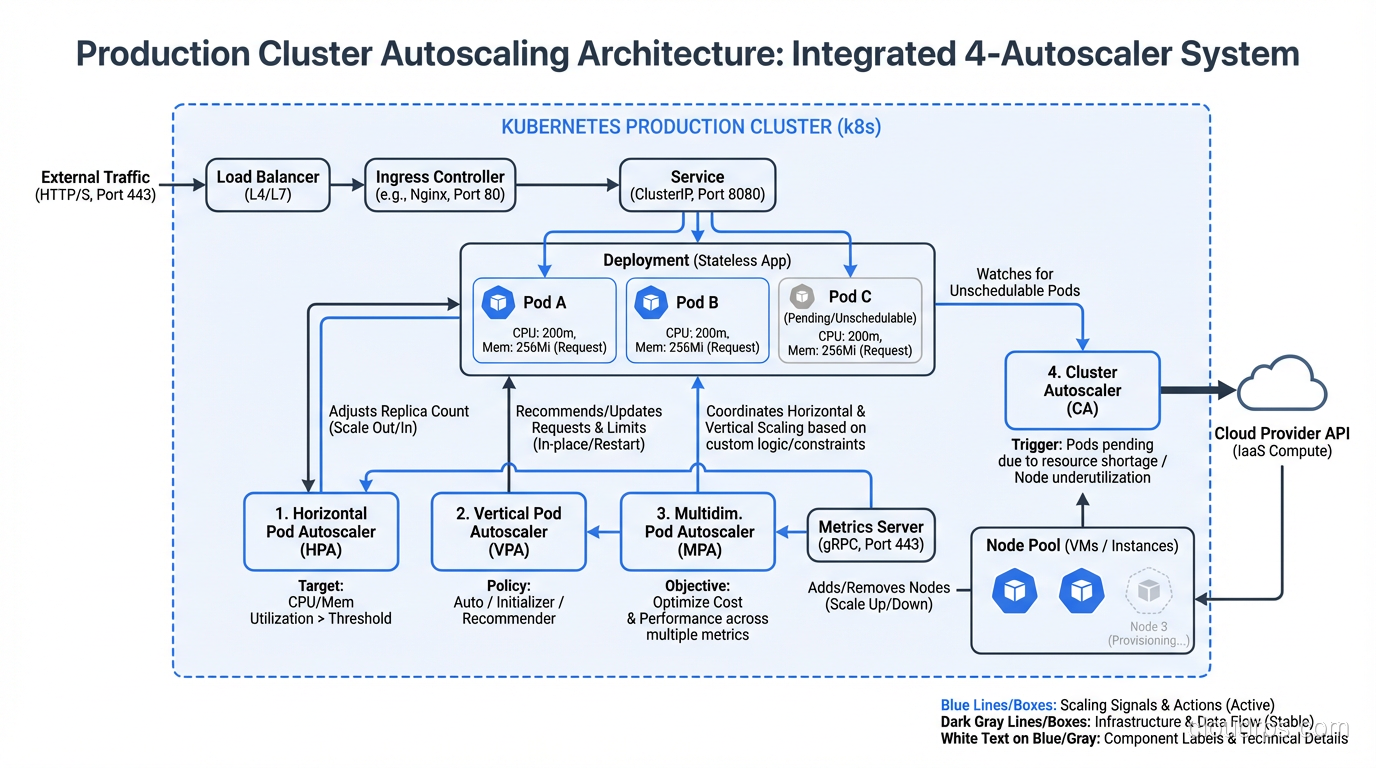
In a mature production cluster, you’ll likely use all four autoscalers simultaneously. Here’s how they interact in a well-designed setup:
Web-facing services (API servers, web frontends):
- HPA scales pods based on requests per second or CPU (custom metrics preferred)
- VPA in recommendation mode to inform resource request updates at deploy time
- Cluster Autoscaler adds nodes when new pods can’t be scheduled
Event-driven workers (queue consumers, batch processors):
- KEDA scales based on queue depth, with scale-to-zero enabled
- VPA in Auto mode (acceptable here because these workloads are typically stateless and tolerant of restarts)
- Cluster Autoscaler adds nodes as KEDA scales up workers
Background services (cron jobs, data pipelines):
- KEDA with cron triggers for predictable workloads
- VPA for right-sizing, since these workloads often have variable resource profiles
- Cluster Autoscaler handles node capacity
The key principle: pod autoscalers (HPA, VPA, KEDA) create demand, and the Cluster Autoscaler supplies capacity. Don’t try to make the Cluster Autoscaler proactively scale. Let pod-level autoscalers drive the decisions.
Common Mistakes and Gotchas
After helping dozens of teams implement Kubernetes autoscaling, these are the patterns I see repeatedly:
1. Missing Resource Requests
HPA can’t calculate CPU utilization percentages without resource requests. VPA needs historical usage data to make recommendations. The Cluster Autoscaler uses requests to determine node capacity. If your pods don’t have resource requests set, autoscaling is essentially blind. I cannot stress this enough: resource requests are not optional. They’re the foundation that every autoscaler depends on.
2. Scaling on the Wrong Metric
CPU utilization is the default, and it’s often wrong. If your service is I/O-bound (waiting on database queries, external API calls, or disk), CPU will stay low even when the service is overloaded. Map out your actual bottleneck and scale on a metric that reflects it.
Good monitoring is a prerequisite for good autoscaling. If you haven’t instrumented your applications properly, start there. I covered this extensively in monitoring and logging best practices.
3. Ignoring Scaling Velocity
Default HPA behavior allows rapid scale-up but equally rapid scale-down. This causes thrashing: a brief spike scales you to 20 pods, the spike passes, and you scale down to 3 pods. Two minutes later, another spike and you’re back to 20. Each scale-up incurs cold start costs. Use the behavior section to set asymmetric policies.
4. Not Testing Autoscaling
I’ve seen teams that deploy autoscaling configurations and then wait for a real traffic spike to find out if they work. That’s gambling with production. Load test your autoscaling regularly. Use tools like k6, Locust, or hey to generate realistic traffic patterns and verify that:
- Pods scale at the expected thresholds
- New pods become ready before the old ones are overwhelmed
- Scale-down happens gracefully
- The Cluster Autoscaler provisions nodes quickly enough
5. PodDisruptionBudgets Blocking Everything
PDBs are essential for fault tolerance, but overly restrictive PDBs can prevent VPA from right-sizing pods and the Cluster Autoscaler from draining nodes. If you set maxUnavailable: 0, nothing can evict your pods. A good default is maxUnavailable: 1 or minAvailable: N-1.
6. Forgetting About the Platform Layer
If your team runs a platform engineering practice, autoscaling policies should be part of the platform’s golden paths. Don’t make every team figure out autoscaling from scratch. Provide sensible defaults through Helm chart values or custom resource templates, with escape hatches for teams that need custom behavior.
Decision Framework: Which Autoscaler When?
Here’s my practical framework for choosing:
Start with HPA if your workload has relatively steady traffic patterns with predictable growth. Use CPU or request-based metrics. This covers most web services and API servers.
Add KEDA if your workload is event-driven, bursty, or needs scale-to-zero. Queue consumers, webhook processors, scheduled jobs, and anything that responds to external events.
Deploy VPA in recommendation mode for everything. Even if you don’t use Auto mode, VPA’s recommendations tell you whether your resource requests are right. Review them monthly.
The Cluster Autoscaler should always be running in any cluster where you want elastic infrastructure. It’s the safety net that ensures pods always have somewhere to run.
Use HPA + KEDA together when you need both request-based and event-based scaling. KEDA can manage HPA objects, so they compose well.
Avoid HPA + VPA on the same resource metric. This is the one combination that causes real problems.
A War Story to Close
I’ll end with one more real-world lesson. A fintech team I worked with had a beautiful autoscaling setup: HPA on custom metrics, Cluster Autoscaler with priority-based expanders, KEDA for their async workers. It all worked perfectly in staging.
In production, their HPA scaled from 5 to 40 pods in under two minutes during a traffic burst. The Cluster Autoscaler kicked in and started adding nodes. But the new pods all tried to establish connections to their PostgreSQL database simultaneously, and the database had a connection limit of 100. The existing 5 pods each had 20 connections. The new 35 pods couldn’t connect, failed their readiness probes, got killed, and respawned in a loop. The HPA saw high request latency and tried to scale up even more.
The fix wasn’t in the autoscaler configuration. It was adding PgBouncer as a connection pooler and setting a maxSurge on deployments. The lesson: autoscaling is a systems problem, not a configuration problem. You need to think about every component in the request path and whether it can handle the scale you’re asking for.
Kubernetes gives you powerful autoscaling primitives. But primitives are just building blocks. The engineering work is in composing them correctly, choosing the right metrics, setting sane boundaries, and testing before production proves you wrong.
Get Cloud Architecture Insights
Practical deep dives on infrastructure, security, and scaling. No spam, no fluff.
By subscribing, you agree to receive emails. Unsubscribe anytime.