Early in my career, we enforced security policies the way most teams did: documentation. We had a runbook that said “all S3 buckets must have encryption enabled” and “all Kubernetes pods must have resource limits.” People would read the runbook. People would forget the runbook. We’d find unencrypted buckets in security audits. We’d find pods consuming unbounded memory that caused node pressure and cascading failures.
The gap between “we have a policy” and “the policy is actually enforced” is where security incidents and operational problems live. Policy as code closes that gap by encoding your rules in machine-readable, automatically-enforced artifacts that live in version control alongside your infrastructure code.
This isn’t theoretical. It’s now standard practice for any organization running Kubernetes at scale, and the tooling around it (primarily OPA/Gatekeeper and Kyverno) has matured to the point where there’s no reason not to use it.
What Policy as Code Actually Means
Policy as code is the practice of defining infrastructure and security policies as code that can be version-controlled, tested, and automatically enforced. Instead of a policy document saying “containers must not run as root,” you have a machine-enforceable rule that rejects any deployment attempting to run as root.
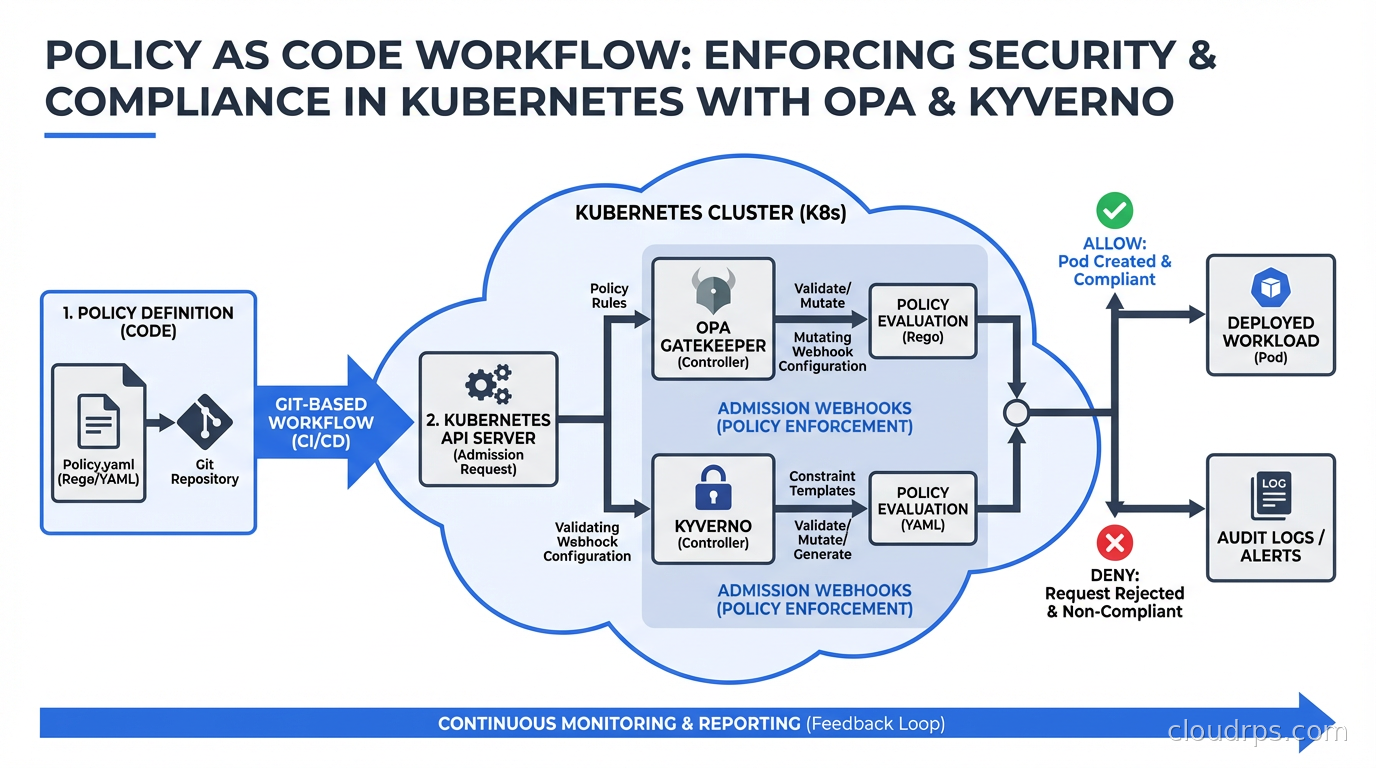
In Kubernetes, the enforcement mechanism is admission controllers. When you submit a resource to the Kubernetes API (a Deployment, a Pod, a NetworkPolicy), the API server runs it through a chain of admission controllers before persisting it. Admission controllers can validate (reject non-compliant resources) or mutate (automatically modify resources to make them compliant). Policy as code tools integrate with Kubernetes as dynamic admission controllers via webhooks.
This is fundamentally different from scanning tools that find policy violations after the fact. Admission-time enforcement means non-compliant workloads never get scheduled. You’re shifting the policy check left, to the moment of submission, not finding problems hours or days later in a scanning report.
Two tools dominate this space: Open Policy Agent (OPA) with its Kubernetes integration Gatekeeper, and Kyverno. They solve the same problem with different approaches.
Open Policy Agent (OPA) and Rego
OPA is a general-purpose policy engine that uses its own policy language called Rego. It’s not Kubernetes-specific: OPA can enforce policies for Kubernetes admission control, Terraform plans, API gateways, CI/CD pipelines, and custom applications. It’s the Swiss Army knife of policy enforcement.
Rego is a declarative, logic-based language. This is both its strength and its learning curve. Rego’s expressiveness lets you encode complex policies, but it takes time to internalize the query-based evaluation model.
Here’s a simple Rego policy that requires all pods to have resource limits:
package kubernetes.admission

deny[msg] {
  input.request.kind.kind == "Pod"
  container := input.request.object.spec.containers[_]
  not container.resources.limits
  msg := sprintf("Container '%v' must have resource limits", [container.name])
}
The input object contains the full admission request. You write rules that produce deny messages when violations occur. If any deny rules produce output, the admission request is rejected with those messages.
Gatekeeper is the Kubernetes-native wrapper around OPA. You define policies using Kubernetes custom resources: ConstraintTemplate (the policy definition, written in Rego) and Constraint (an instance of a template with parameters and scope). This lets you manage policies with the same kubectl workflow you use for everything else.
apiVersion: templates.gatekeeper.sh/v1
kind: ConstraintTemplate
metadata:
  name: k8srequiredresources
spec:
  crd:
    spec:
      names:
        kind: K8sRequiredResources
  targets:
    - target: admission.k8s.gatekeeper.sh
      rego: |
        package k8srequiredresources

        violation[{"msg": msg}] {
          container := input.review.object.spec.containers[_]
          not container.resources.limits
          msg := sprintf("Container '%v' missing resource limits", [container.name])
        }
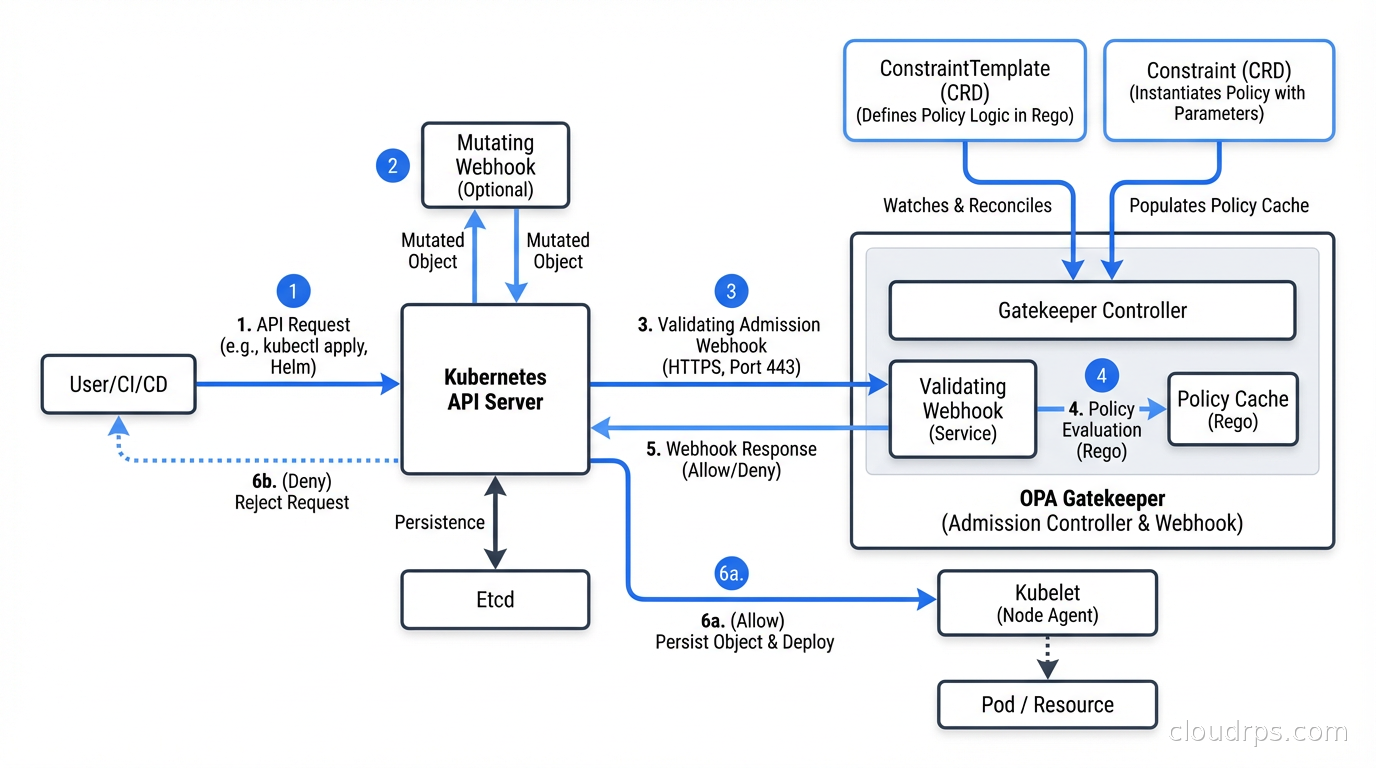
OPA/Gatekeeper’s strengths: it’s the most flexible option. If you need to enforce policies that span multiple resource types, integrate with external data sources, or apply the same policy engine to non-Kubernetes systems, OPA is the right choice. The Rego language can express virtually any policy logic.
OPA/Gatekeeper’s weaknesses: Rego has a learning curve. Writing Rego that’s correct and readable requires practice. Debugging why a policy fires or doesn’t fire can be non-obvious. The separation between ConstraintTemplates and Constraints adds verbosity. Teams with limited Kubernetes experience often struggle with Gatekeeper’s operational complexity.
Kyverno: The Kubernetes-Native Alternative
Kyverno was built specifically for Kubernetes policy enforcement. Its policies are written entirely in YAML, using familiar Kubernetes patterns like field selectors, JMESPath expressions, and label matching. If you know Kubernetes manifests, you can write Kyverno policies without learning a new language.
The same resource limits requirement in Kyverno:
apiVersion: kyverno.io/v1
kind: ClusterPolicy
metadata:
  name: require-resource-limits
spec:
  validationFailureAction: Enforce
  rules:
    - name: require-limits
      match:
        any:
        - resources:
            kinds:
            - Pod
      validate:
        message: "Resource limits are required for all containers"
        pattern:
          spec:
            containers:
            - resources:
                limits:
                  memory: "?*"
                  cpu: "?*"
Kyverno supports three types of rules: validation (block non-compliant resources), mutation (automatically modify resources), and generation (create new resources based on triggers). This makes it uniquely capable of not just enforcing policies but also applying defaults automatically.
For example, you can have Kyverno automatically add resource limits to pods that don’t specify them, rather than rejecting them. This is useful during initial adoption: you can set policies to audit mode first, observe violations, then switch to enforce while using mutation to auto-fix the common cases.
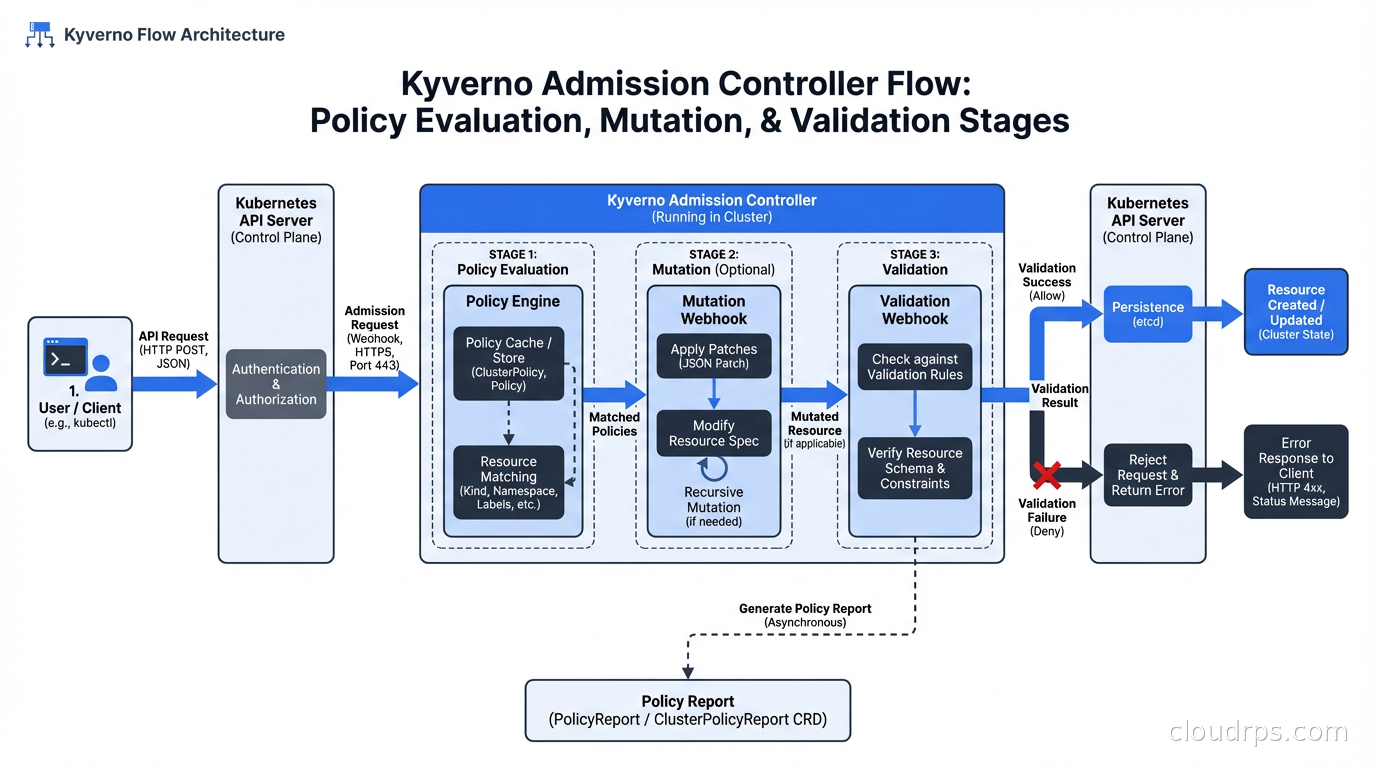
Kyverno also supports policy exceptions (for specific namespaces or workloads that have legitimate reasons to deviate) and policy reports (CRDs that record policy violations for audit purposes without blocking admission, useful for discovering violations before enforcement).
Kyverno’s strengths: much lower barrier to entry for teams already familiar with Kubernetes YAML. The mutation capability is genuinely powerful. Good CLI tooling (kyverno apply --policy ... --resource ...) for local testing. Active CNCF community and rapid development.
Kyverno’s weaknesses: less flexible than OPA for complex cross-resource policies. The YAML-based policy language can become verbose for complex logic. JMESPath expressions embedded in YAML are hard to debug.
OPA vs Kyverno: When to Choose Each
My practical guidance after using both in production:
Choose Kyverno when: your team is primarily Kubernetes operators (not programmers), you want fast onboarding with minimal new tooling, you need mutation capabilities, or you’re enforcing Kubernetes-specific policies without needing cross-system policy consistency.
Choose OPA/Gatekeeper when: you need to enforce the same policies across Kubernetes and non-Kubernetes systems (Terraform, APIs, CI/CD), you have complex logic that’s difficult to express in YAML patterns, or your team has (or is willing to invest in) Rego expertise.
Both are CNCF projects with good long-term viability. This isn’t a choice between a winner and a loser. It’s a trade-off between flexibility and accessibility.
Some organizations run both: OPA for complex cross-system policies and integration with authorization in APIs, Kyverno for Kubernetes-specific admission control. There’s no contradiction in using the right tool for each job.
Common Policies to Implement
Here’s my practical list of policies that every Kubernetes cluster should enforce, regardless of which tool you use:
Security policies:
- Disallow privileged containers (
securityContext.privileged: true) - Require non-root user (
runAsNonRoot: trueor specificrunAsUsernot equal to 0) - Disallow
hostNetwork,hostPID,hostIPC(allows pods to escape namespace isolation) - Require read-only root filesystem where possible
- Disallow mounting sensitive host paths
- Require specific security context capabilities (drop ALL, add only needed capabilities)
Resource management:
- Require CPU and memory limits on all containers
- Require CPU and memory requests (for proper scheduling)
- Enforce LimitRange boundaries per namespace
- Require namespace resource quotas
Image policies:
- Require images from approved registries (not Docker Hub directly)
- Require image tags to be specific (not
latest) - Require signed images (integrates with software supply chain security tools like cosign)
- Require vulnerability scan results to be below a threshold
Network policies:
- Require default-deny NetworkPolicy in every namespace
- Validate ingress rules against allowed patterns
Labels and metadata:
- Require specific labels (team, environment, cost-center) for resource tracking
- Require Pod disruption budgets for production workloads
Operational policies:
- Require liveness and readiness probes
- Disallow
kubectl execinto production pods (via ValidatingWebhookConfiguration on exec subresource) - Require specific node selectors or tolerations for sensitive workloads
Integration with GitOps and CI/CD
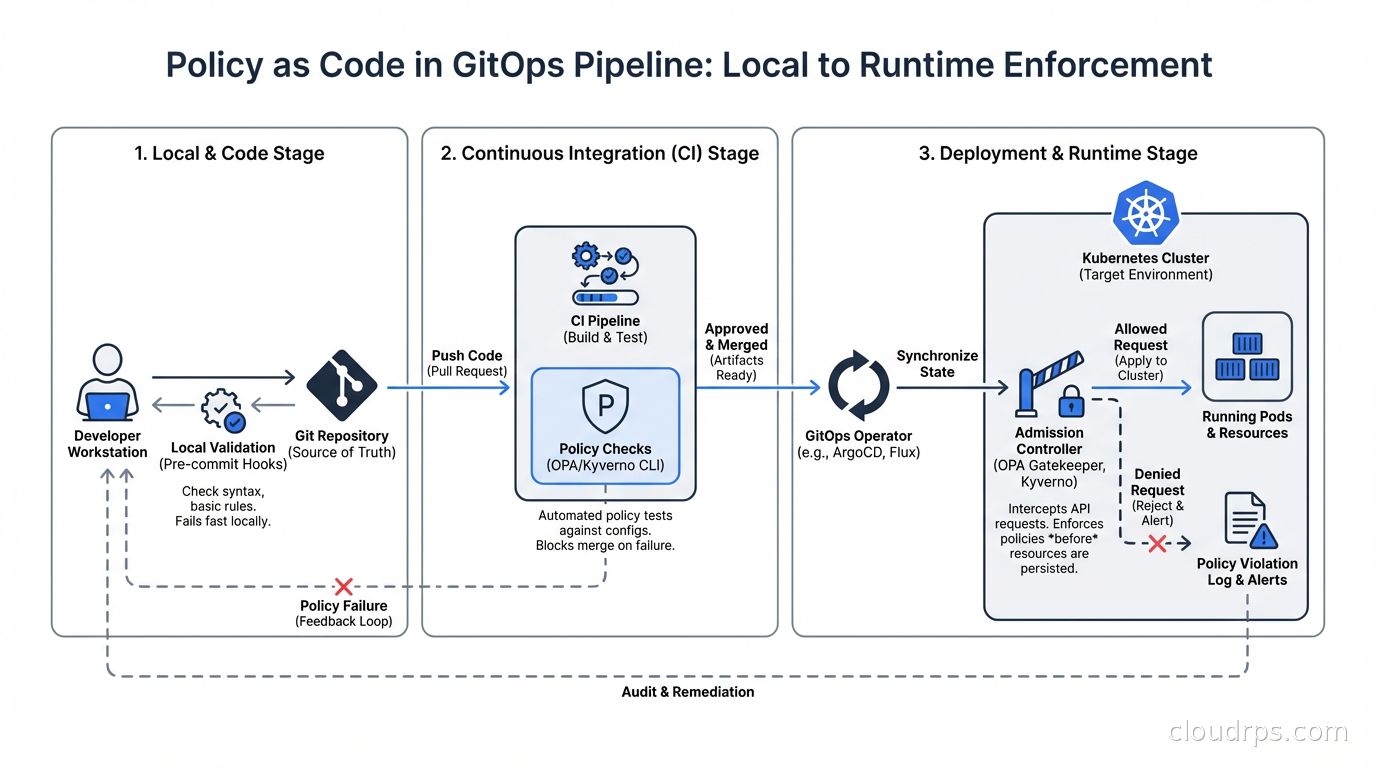
Policy as code becomes significantly more powerful when integrated with your GitOps pipeline. The goal is to catch policy violations at pull request time, not at admission time. Admission-time enforcement is your last line of defense; ideally, non-compliant manifests never reach the cluster.
Both OPA (via conftest) and Kyverno (via kyverno apply) can be run locally or in CI to validate manifests before they’re committed. Add policy checks to your CI pipeline: when a developer pushes changes to Kubernetes manifests, run the policies against the changed files and fail the pipeline if violations are found.
The workflow: developer runs kyverno apply --policy policies/ --resource manifests/ locally, sees violations, fixes them before pushing. CI runs the same check. ArgoCD or Flux deploying to the cluster has admission control as the final gate.
This layered approach means violations are caught early (local development), confirmed (CI), and enforced (admission control). The developer feedback loop is short.
Integration with Zero Trust Security
Policy as code is a practical implementation mechanism for zero trust security principles in Kubernetes. Zero trust says “never trust, always verify” and “enforce least privilege.” Policy as code is how you enforce those principles at the infrastructure level.
Specifically: pod security standards (formerly pod security policies) define security contexts that workloads must conform to. OPA or Kyverno implements and extends these standards. Network policies enforce microsegmentation (each workload communicates only with explicitly allowed peers). RBAC combined with OPA authorization policies enforces least-privilege access to the Kubernetes API itself. And admission policies enforce that workloads have the required security configurations before they’re allowed to run.
The combination of all of these is what zero trust in cloud infrastructure actually looks like in practice. Not a concept but a set of concrete, enforced rules.
Practical Tips from Production
Start in audit mode: Both OPA (warn mode) and Kyverno (Audit action) can log violations without blocking. Start here. Discover what’s already violating your policies before you enforce anything. I’ve seen teams go straight to enforce mode and immediately break production workloads because they didn’t know what exceptions existed.
Use namespaced policies for per-team control: Cluster-wide policies for baseline security, namespace-scoped policies for team-specific requirements. This lets platform teams enforce company-wide standards while allowing development teams flexibility within their namespaces.
Build a policy library incrementally: Don’t try to implement 50 policies on day one. Start with the highest-priority security requirements (no privileged containers, required resource limits, approved image registries). Add policies as your organization matures.
Test policies before deploying: Both tools have CLI testing capabilities. Use them. A policy that silently allows everything or incorrectly blocks valid workloads is worse than no policy.
Document exceptions: When you add an exception for a legitimate use case, add a comment explaining why. Your future self (and your auditors) will thank you. Secret management systems, monitoring agents, and security tools sometimes legitimately need elevated privileges. Document those exceptions explicitly rather than just disabling the policy.
Policy as code isn’t about restricting developers. It’s about making the compliant path the easy path and the non-compliant path visible and intentional. When done well, it protects teams from themselves while reducing the cognitive burden of remembering every security requirement. The policy lives in code, enforced automatically, visible to everyone.
That’s a better outcome than a runbook nobody reads.
Get Cloud Architecture Insights
Practical deep dives on infrastructure, security, and scaling. No spam, no fluff.
By subscribing, you agree to receive emails. Unsubscribe anytime.