I have rebuilt more RAID arrays at three in the morning than I care to admit. The first time was in 2002. A RAID 5 array on a production database server lost a second drive during a rebuild after the first failure. We lost the array, the data, and about sixteen hours of my weekend restoring from tape backup. That experience permanently changed how I think about RAID.
RAID (Redundant Array of Independent Disks) is one of those technologies that every infrastructure professional needs to understand deeply, not superficially. I meet people regularly who know that “RAID 5 uses striping with parity” but have no idea what that means for rebuild times, write performance, or failure probability. This post is my attempt to fix that.
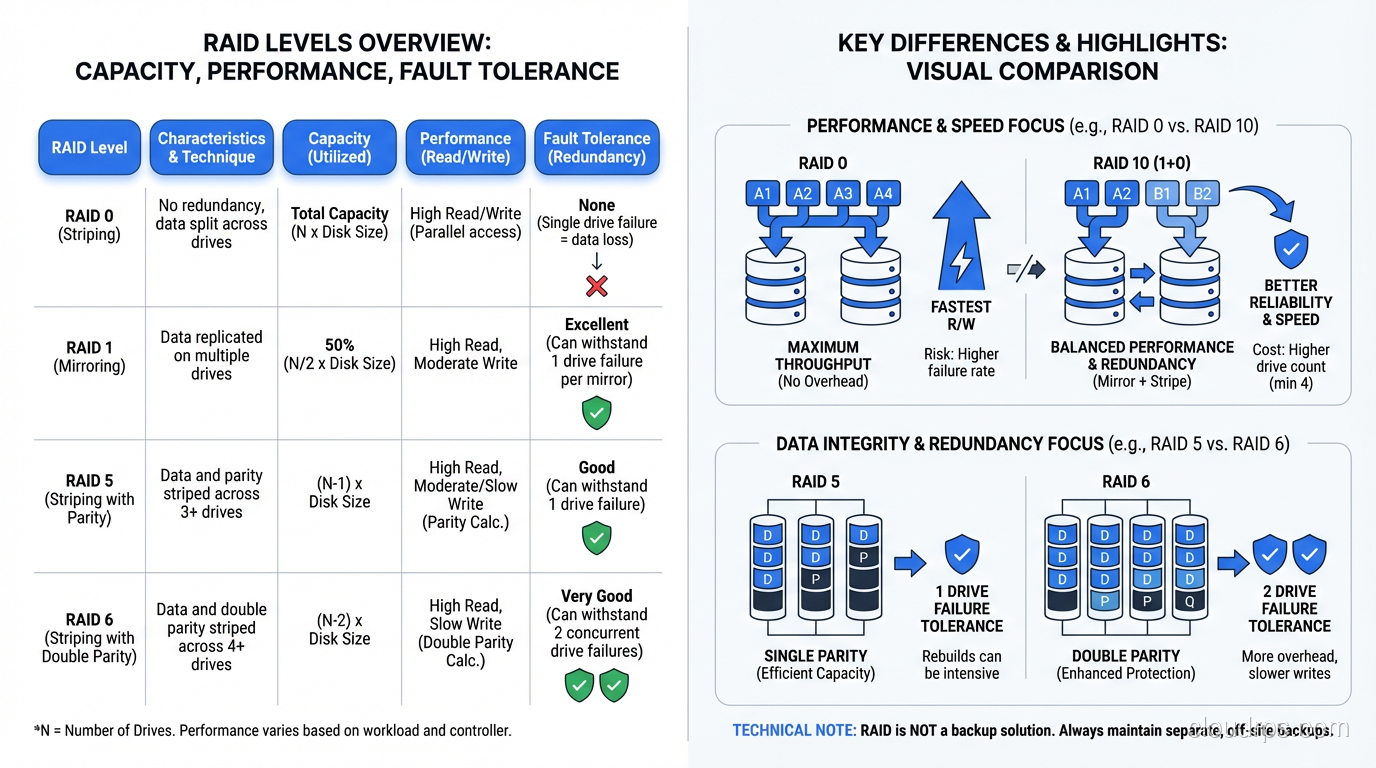
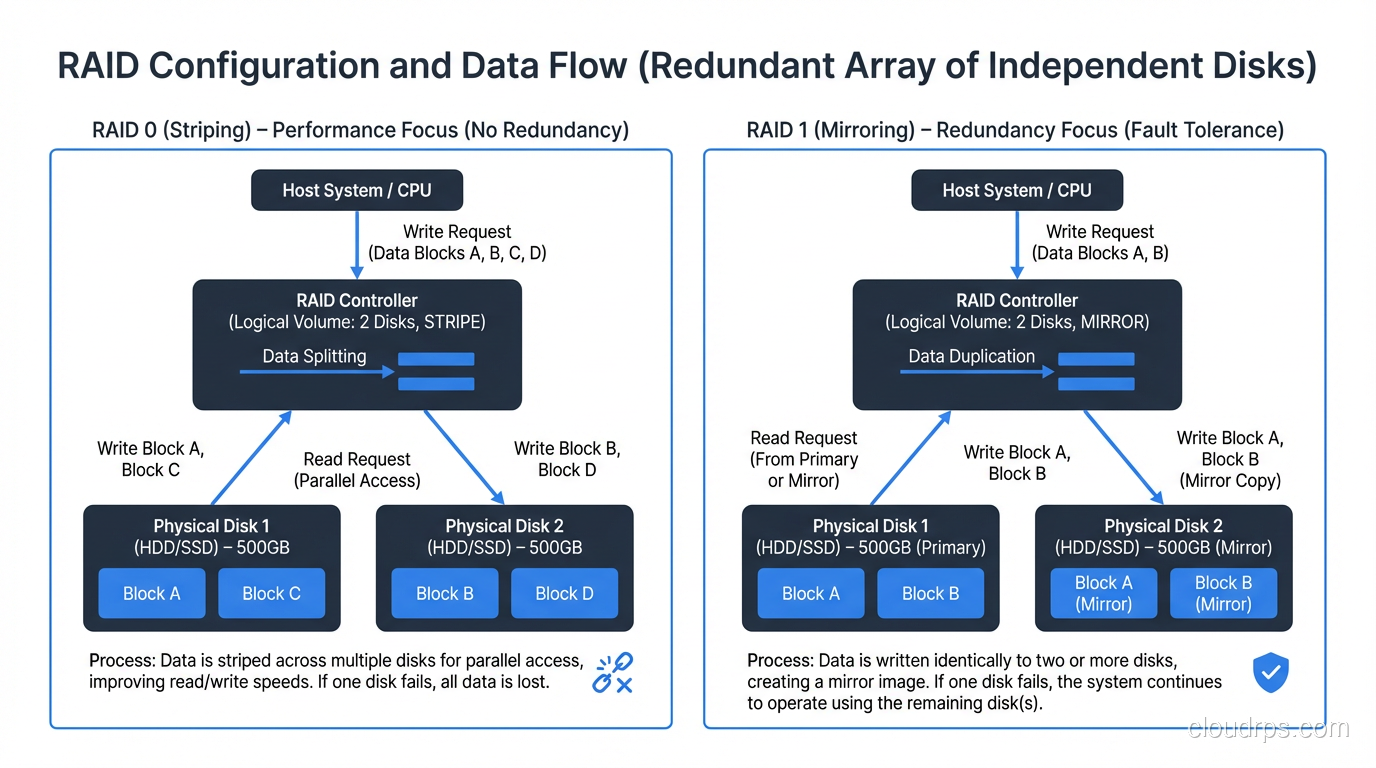
RAID 0: Speed Without a Safety Net
RAID 0 stripes data across two or more disks with no redundancy whatsoever. If you have two 1TB drives in RAID 0, you get 2TB of usable space and roughly double the sequential read and write throughput, because the controller can read from and write to both disks simultaneously.
The catch is obvious: if either drive fails, you lose everything. RAID 0 is not redundant at all. It is the only RAID level that actually increases your risk of data loss compared to a single drive, because you now have two points of failure instead of one.
When RAID 0 Makes Sense
Temporary data that can be recreated. Scratch space for video editing. Build caches. Anything where performance matters and the data is disposable. I have used RAID 0 for database temp tablespaces when sort performance was the bottleneck and the temp data was, by definition, ephemeral.
Never use RAID 0 for anything you cannot afford to lose. I should not have to say this, but I have seen production databases on RAID 0. More than once.
RAID 1: Mirroring Done Right
RAID 1 mirrors data across two (or more) disks. Every write goes to both disks. If one fails, the other has a complete copy. You lose half your raw capacity to redundancy (two 1TB drives give you 1TB of usable space), but you get instant failover and read performance that can actually exceed a single drive, since reads can be served from either mirror.
The Practical Reality of RAID 1
RAID 1 is the simplest form of redundancy and the fastest to rebuild. When a drive fails in a RAID 1, the rebuild just copies data from the surviving mirror to the replacement drive. There is no parity calculation, no complex reconstruction. This makes RAID 1 the safest option when your priority is minimizing the window of vulnerability during a disk failure.
I have used RAID 1 for OS boot volumes for decades. Two drives, mirrored, with the boot loader on both. If a drive dies, the server keeps running without interruption and the rebuild is fast and low-risk.
The downside is cost. You are paying for twice the raw capacity you actually use. For two or four drives, this is fine. For a shelf of twenty-four drives, that 50% overhead becomes very expensive.
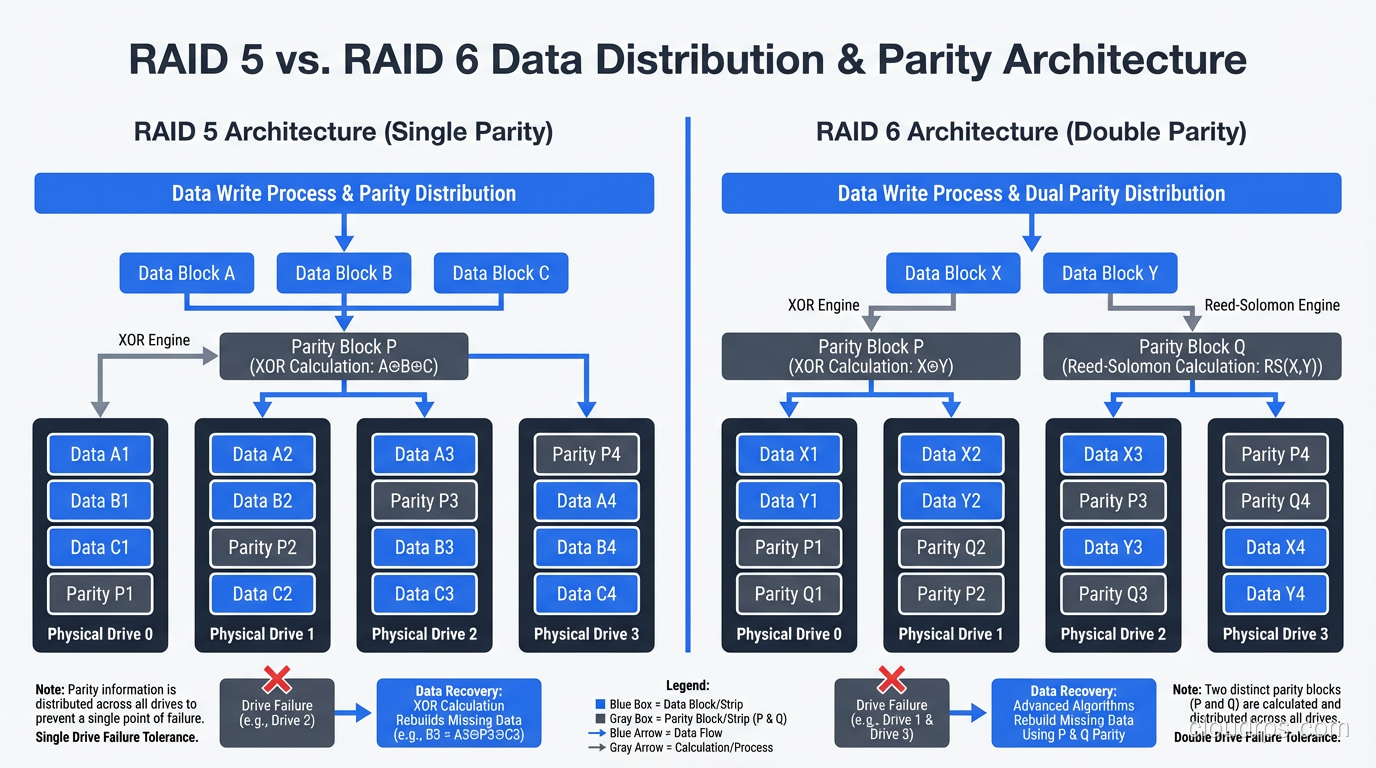
RAID 5: The Workhorse That Aged Poorly
RAID 5 stripes data across three or more disks with distributed parity. For every stripe across the array, one drive’s worth of space holds parity data, a calculated value that allows the array to reconstruct any single drive’s data from the remaining drives.
With four 1TB drives in RAID 5, you get 3TB of usable space (one drive’s worth goes to parity) and you can survive one drive failure. Reads are fast because data is spread across all drives. Writes are slower than RAID 0 or RAID 1 because the controller has to calculate and write parity for every data write.
The Write Penalty Nobody Warns You About
Here is something that trips people up: a single random write on a RAID 5 array requires four I/O operations. The controller must read the old data block, read the old parity block, calculate the new parity, write the new data block, and write the new parity block. In practice, this means random write performance on RAID 5 is significantly worse than RAID 0 or RAID 1.
For read-heavy workloads (file servers, web content, archival storage) this is acceptable. For write-heavy workloads (transactional databases, logging systems, anything with constant random writes) the write penalty is a serious performance problem. I spent a very unpleasant week in 2009 troubleshooting a database performance issue that turned out to be nothing more than RAID 5’s write penalty on a workload that did 80% writes.
Why RAID 5 Is Dying
The real problem with RAID 5 in 2025 is rebuild time on large drives. When a drive fails in a RAID 5 array, the controller must read every block from every surviving drive to reconstruct the failed drive’s data. With modern drives in the 8TB to 20TB range, this rebuild can take 12 to 48 hours.
During that rebuild, the array is running in degraded mode with zero redundancy. If a second drive fails during the rebuild, you lose the entire array. And here is the terrifying math: the probability of an unrecoverable read error (URE) during a full-disk rebuild on a large, consumer-grade drive is not negligible. A drive with a URE rate of 1 in 10^14 bits has roughly a 50% chance of encountering an unrecoverable error when reading 10TB of data.
This is exactly what happened to me in 2002, and it is why I stopped recommending RAID 5 for arrays with drives larger than about 2TB years ago. For anything important, use RAID 6 or RAID 10.
RAID 6: Double Parity for Large Arrays
RAID 6 is RAID 5 with an extra parity block per stripe. It uses two independent parity calculations, which means it can survive two simultaneous drive failures. With four 1TB drives, you get 2TB of usable space (two drives’ worth goes to parity).
When RAID 6 Earns Its Keep
RAID 6 is the right choice for large arrays where rebuild times are long and the probability of a second failure during rebuild is significant. If you are building a NAS appliance with twelve 16TB drives, RAID 6 gives you the safety margin you need to sleep at night.
The write penalty is worse than RAID 5 (six I/O operations per write instead of four), but for the read-heavy workloads where large arrays are typically used, this is acceptable. I have deployed RAID 6 extensively for archival storage, backup targets, and media repositories where capacity and data protection matter more than write performance.
The RAID 6 Rebuild Catch
RAID 6 survives two failures, but the rebuild after one failure is even slower than RAID 5 because the controller has more parity calculations to perform. During a single-drive rebuild of a RAID 6, you can survive another failure (which is the whole point), but the array performance will be abysmal during that rebuild. Plan your maintenance windows accordingly.
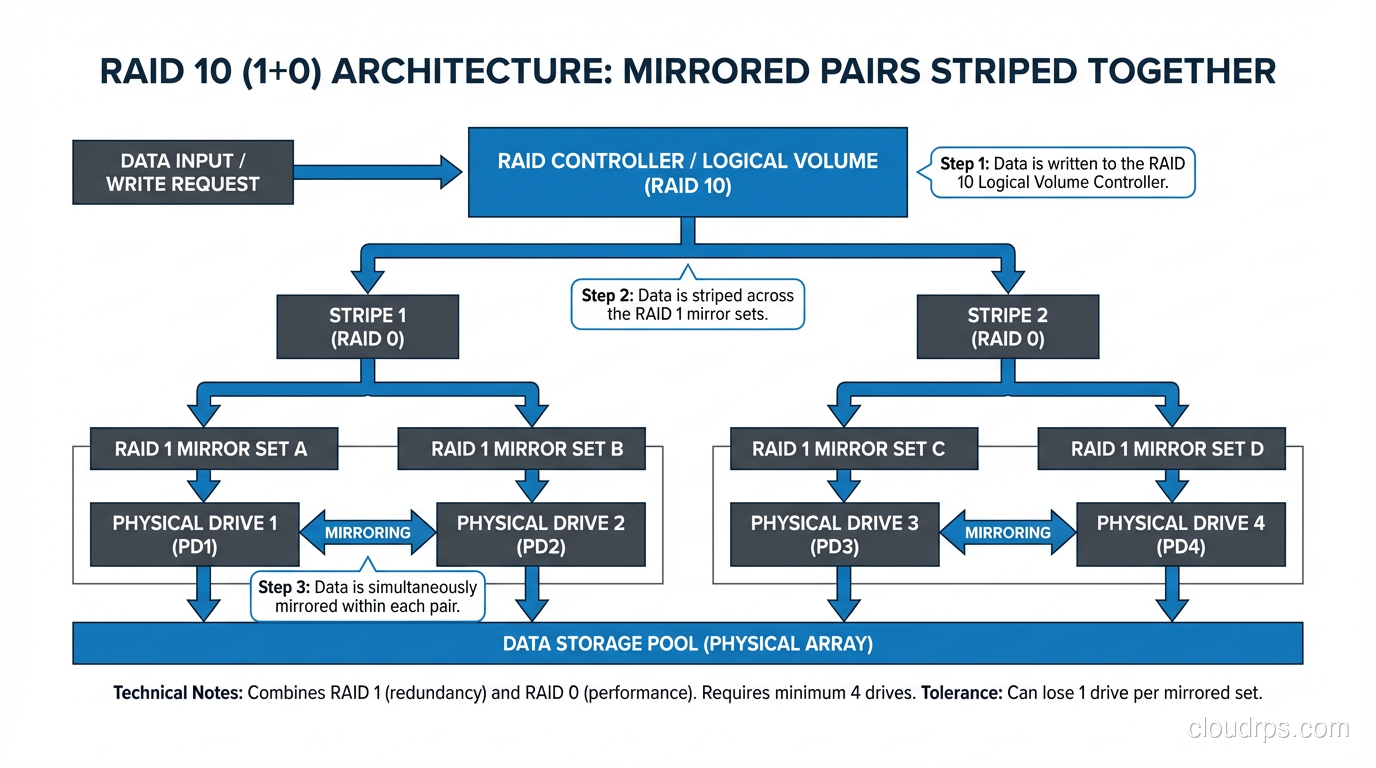
RAID 10: The Performance Champion
RAID 10 (sometimes written as RAID 1+0) combines mirroring and striping. You take pairs of drives, mirror them (RAID 1), and then stripe across the mirrored pairs (RAID 0). With four 1TB drives, you get 2TB of usable space (same as RAID 6) but with dramatically better performance.
Why I Use RAID 10 for Databases
RAID 10 has no write penalty. Every write goes to a mirrored pair, just two I/O operations, same as RAID 1. There is no parity calculation. For a database workload doing 50,000 random writes per second, the difference between RAID 10’s two I/Os per write and RAID 5’s four I/Os per write is enormous.
Read performance is also excellent because you are striping across multiple mirror pairs, and reads can be served from either side of each mirror. A RAID 10 array with eight drives can serve reads from all eight drives simultaneously.
Rebuild times are fast because rebuilding a RAID 10 only requires copying data from the surviving mirror in the affected pair, not reading the entire array. On an eight-drive RAID 10, a single drive failure only requires reading one drive’s worth of data, not seven.
This is why every database server I have built in the last fifteen years uses RAID 10 for the data volumes. The capacity overhead is 50% (same as RAID 1), which is significant, but for database storage where performance and reliability are paramount, it is worth every penny.
The RAID 10 Failure Mode
RAID 10 can tolerate multiple drive failures, but only if they are in different mirror pairs. If both drives in a single pair fail, you lose the array. With four drives in two pairs, you can survive any single failure and some double failures (specifically, one failure in each pair). With eight drives in four pairs, the odds get much better.
For SSD-based systems where drive failure rates are lower than spinning disks, RAID 10 provides an excellent balance of performance and protection.
The Decision Matrix
Here is how I choose a RAID level, and it has not changed much in twenty years.
RAID 0: Scratch space, temp data, anything disposable where you need maximum throughput. Never for production data.
RAID 1: Boot volumes, small critical datasets, any two-drive configuration. Simple, fast, safe.
RAID 5: Legacy deployments with small drives under 2TB and read-heavy workloads. I do not recommend it for new builds.
RAID 6: Large archive arrays, NAS with many big drives, any configuration where rebuild time exceeds 12 hours. The safety net you need for big iron.
RAID 10: Databases, virtual machine storage, any write-heavy or latency-sensitive workload. The performance and rebuild speed justify the capacity cost.
Hot Spares: Your Insurance Policy
A hot spare is a drive installed in the array but not actively used. When a drive fails, the controller automatically starts rebuilding onto the hot spare without waiting for a human to swap drives. This reduces your window of vulnerability from “however long it takes someone to notice and replace the drive” to “however long the rebuild takes.”
For any RAID 5 or RAID 6 array, hot spares are mandatory in my book. For RAID 10 in production, I always include a hot spare. The cost of one extra drive is trivial compared to the cost of data loss or extended degraded operation.
RAID Is Not Backup
I say this in every storage presentation I give, and people still get it wrong: RAID protects against drive failure. It does not protect against accidental deletion, corruption, ransomware, firmware bugs, or fire. RAID is a high availability mechanism, not a data protection strategy.
If your backup plan is “we have RAID,” you do not have a backup plan. I have personally recovered data for three separate organizations that believed RAID was backup and learned otherwise the hard way. Two of those recoveries were possible because we had actual backups. The third was not.
Hardware RAID vs Software RAID
Hardware RAID uses a dedicated controller card with its own processor and cache to manage the array. Software RAID uses the host CPU and operating system to manage the array: Linux md, Windows Storage Spaces, ZFS.
Twenty years ago, hardware RAID was the clear winner for performance. Today, with modern CPUs and software RAID implementations like ZFS and Linux md, the gap has narrowed dramatically. Software RAID has significant advantages in flexibility, cost, and portability, since your array configuration is not locked to a specific controller vendor.
I have moved almost entirely to software RAID (specifically ZFS) for systems I build from scratch. The ability to manage disks, checksums, snapshots, and replication from a single software layer is powerful. But if you are running a legacy server with an existing hardware RAID controller, there is nothing wrong with it. Just make sure you have a spare controller on the shelf, because if that controller dies and you cannot find a compatible replacement, your array might be unreadable.
What I Tell People Starting Out
If you are building storage infrastructure and RAID is new to you, start here: use RAID 10 for anything performance-sensitive, RAID 6 for anything capacity-sensitive, and RAID 1 for small, critical volumes. Skip RAID 5 for new builds. Always include hot spares. And always, always, have backups that are independent of your RAID arrays.
RAID is not glamorous technology. It does not make for good conference talks or impressive LinkedIn posts. But getting RAID right means your systems stay running when drives fail, your databases maintain performance under load, and your data survives the inevitable hardware failures that every storage system will eventually experience. That is worth understanding deeply.

Get Cloud Architecture Insights
Practical deep dives on infrastructure, security, and scaling. No spam, no fluff.
By subscribing, you agree to receive emails. Unsubscribe anytime.