A few years into my career, I inherited a monorepo from a team that had just been acquired. First thing I did was grep the git log for AWS_SECRET_ACCESS_KEY. I found eleven. Three of them were still active, one pointed to a production S3 bucket holding eight years of customer billing records. The bucket had no logging enabled, so we had no idea if anyone had ever accessed it through that key.
That incident cost the team six weeks of remediation work, a mandatory third-party security audit, and a very uncomfortable conversation with our CISO. The engineer who committed the first key had moved on two years earlier. Nobody noticed because nobody was looking.
Twenty years of doing this work has taught me one thing about secrets in source code: they almost never stay in source code. They metastasize. A key committed to a feature branch gets merged to main, cherry-picked to a release branch, baked into a Docker layer, uploaded to a public ECR repository, exported in a CI artifact, and copied into a runbook by a well-meaning SRE. By the time you find it, you are not dealing with one leak. You are dealing with twelve.
This article is about how to build a detection program that stops secrets before they propagate, and how to handle the historical scan that nobody wants to run.
Why Git History Is Forever (Even After You Delete the Commit)
The most common mistake I see teams make is assuming that deleting a file or reverting a commit removes the secret. It does not. Git stores every version of every file in its object database. The commit that removed the secret is new history. The commit that added it is still there, still reachable if you know the SHA, and will be cloned by every developer who runs git clone. It will be pushed to every fork. It will be scanned by GitHub’s infrastructure and potentially flagged in audit logs you did not know existed.
Truly removing a commit from git history requires a rewrite using git filter-repo (the modern replacement for the old git filter-branch) or BFG Repo Cleaner, followed by a force push to all remotes, followed by every developer re-cloning or resetting their local repository. In practice, this only works if you are fast enough to do it before the repository has been forked, mirrored, or cloned by a CI system. If your repository is public, assume the secret is public. Rotate immediately and treat the deletion as documentation, not remediation.
This is why prevention beats remediation by a wide margin. The only way to win is to not commit secrets in the first place, and to catch them at the earliest possible gate when they slip through anyway.
The Four Detection Gates
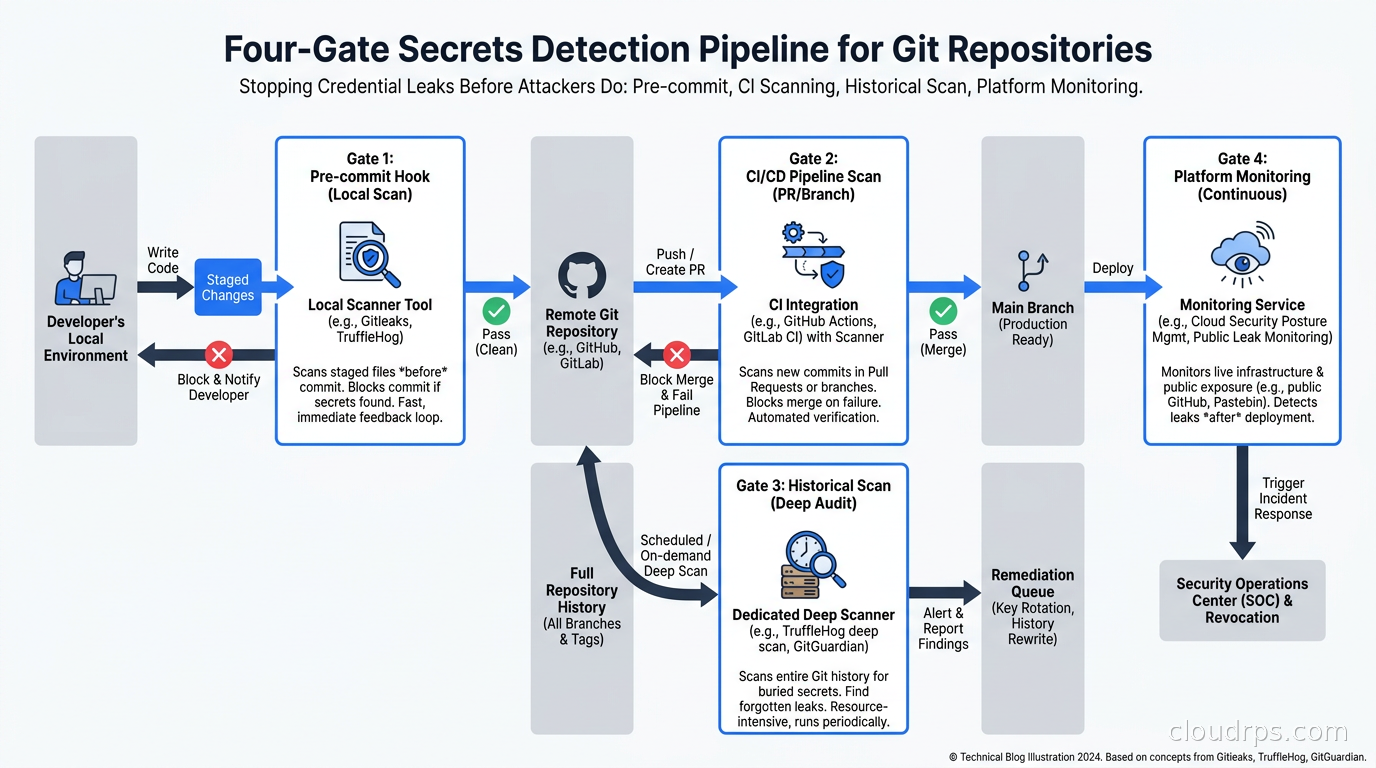
I think of secrets detection as four sequential gates. Each one catches what the previous one missed.
Gate 1: Pre-commit hooks. Runs on the developer’s machine before a commit is created. Fastest feedback loop. No network required. Catches secrets before they ever exist in git history. The limitation is that developers can bypass hooks with --no-verify, and hooks only run if the developer has actually installed them.
Gate 2: CI/CD pipeline scanning. Runs on every push or pull request in your CI system. Cannot be bypassed without disabling the pipeline. Catches secrets that made it past a missing or disabled pre-commit hook.
Gate 3: Full git history scanning. Runs periodically against the entire commit history. Catches secrets that were committed before your scanning program existed, secrets in branches that were merged but not scanned individually, and secrets in submodules.
Gate 4: Platform-level scanning. GitHub, GitLab, and Bitbucket all have built-in secret scanning that monitors pushes and alerts on known secret patterns. Catches secrets from Gate 1-3 that somehow slipped through, and provides a centralized view across all repositories.
No single gate is sufficient. Each has blind spots. The stack only works when all four are running.
Gate 1: Pre-Commit Scanning with Gitleaks
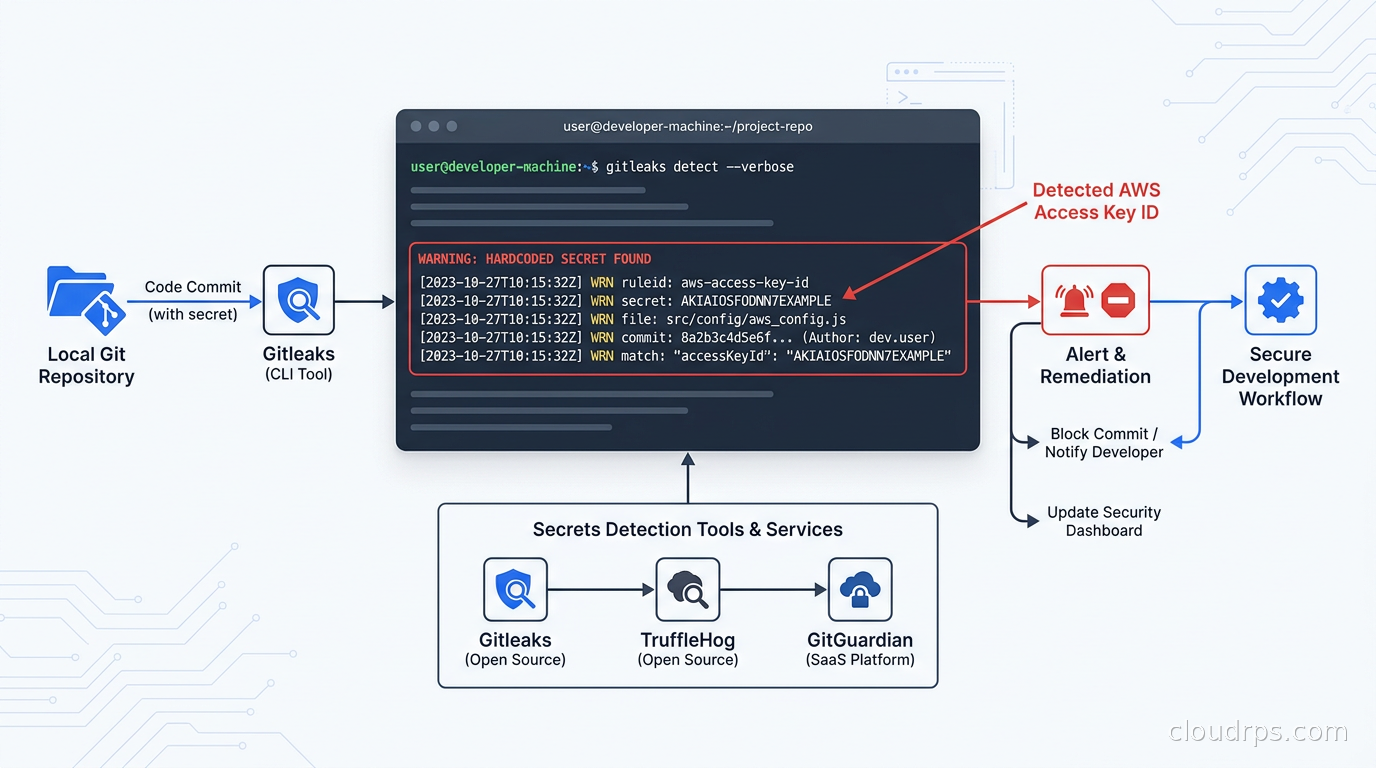
Gitleaks is the tool I recommend for Gate 1. It is fast, simple, and designed specifically for this use case. It scans git diffs in milliseconds, which matters a lot when you want zero friction on the developer workflow.
Install and configure it as a pre-commit hook using the pre-commit framework:
# .pre-commit-config.yaml
repos:
  - repo: https://github.com/gitleaks/gitleaks
    rev: v8.21.0
    hooks:
      - id: gitleaks
Developers run pre-commit install once and Gitleaks runs automatically on every git commit. If it finds a secret, the commit is blocked and the finding is printed to the terminal.
Gitleaks ships with a built-in ruleset covering over 150 secret types: AWS access keys, GitHub tokens, Slack webhooks, Stripe keys, GCP service account JSON, and many more. The ruleset uses regular expressions against the diff content, file names, and commit messages. You can extend it with a .gitleaks.toml configuration file for patterns specific to your environment:
[[rules]]
id = "internal-api-key"
description = "Internal service API key format"
regex = '''INTERNAL_[A-Z]{8}_KEY_[a-zA-Z0-9]{32}'''
tags = ["api-key", "internal"]
One practical issue with any regex-based scanner is false positives. Test suites often contain fixture data that looks like real secrets. Configuration files contain example values. README files contain documentation. Gitleaks lets you allowlist by file path, commit SHA, or inline comment:
// gitleaks:allow
const EXAMPLE_API_KEY = "AKIAIOSFODNN7EXAMPLE"
I recommend reviewing your false positive rate weekly for the first month and tuning the config until your team stops complaining. A scanner that generates ten false positives a day is a scanner that gets disabled.
The --no-verify problem is real. Some teams solve it with mandatory CI enforcement that fails the PR if the pre-commit hook was not run (you can detect this by checking whether the gitleaks scan passes in CI). Others invest in developer onboarding and trust. Neither is perfect. The important thing is that Gate 2 exists for when Gate 1 fails.
Gate 2: CI/CD Pipeline Scanning with TruffleHog
TruffleHog is my choice for Gate 2, and its killer feature is credential verification. Most regex-based scanners will flag a secret pattern and leave it to you to figure out whether the credential is still active. TruffleHog actually tests the credential against the source API and reports whether it is valid. This changes the triage workflow dramatically.
An unverified finding requires you to look up the credential, check your secrets manager, cross-reference IAM logs, and figure out whether anyone ever used it. A verified finding means: this credential is active right now and can be used to authenticate. Those go to the top of the queue.
Add TruffleHog to your GitHub Actions pipeline:
- name: TruffleHog scan
  uses: trufflesecurity/trufflehog@main
  with:
    path: ./
    base: ${{ github.event.repository.default_branch }}
    head: HEAD
    extra_args: --only-verified
The --only-verified flag tells TruffleHog to report only secrets that it has confirmed are active. This reduces alert volume and focuses your team on what actually matters. The trade-off is that inactive or expired credentials will slip through. For Gate 2, I accept that trade-off because Gate 3 will catch historical secrets, and inactive secrets are lower urgency.
TruffleHog supports over 800 secret types with verification logic. The coverage is genuinely impressive. For AWS, it does not just verify that the key is valid but also reports the account ID and the IAM identity behind the key, which helps you understand the blast radius immediately.
For GitLab CI, the configuration is similar:
trufflehog:
  image: trufflesecurity/trufflehog:latest
  script:
    - trufflehog git file://. --since-commit $CI_MERGE_REQUEST_DIFF_BASE_SHA --only-verified --fail
  rules:
    - if: $CI_PIPELINE_SOURCE == "merge_request_event"
The --fail flag is important. Without it, TruffleHog exits with code 0 regardless of findings, which means your pipeline passes even when secrets are found. That defeats the purpose.
This pairs naturally with your CI/CD continuous integration pipeline and should be treated as a blocking check on every pull request, not an optional informational step.
Gate 3: Historical Git Scanning (The Scary One)
If your repository is more than a year old and you have never run a full history scan, I will tell you right now: you will find something. I have run historical scans on dozens of enterprise repositories over the course of my career, and I cannot remember a single one that came up clean.
The historical scan is scary because it is not a question of whether a developer will commit a secret in the future. It is a question of whether a secret is already sitting in your git history right now, possibly having been there for years, and you just do not know about it.
Run TruffleHog against your full history:
trufflehog git file://. --only-verified --json > findings.json
Or with Gitleaks for a comprehensive non-verified scan:
gitleaks detect --source . --report-format json --report-path full-scan.json
This scan can take hours on large repositories. Run it on a dedicated machine or in a CI job with a long timeout. The output will be a JSON file of findings sorted by commit date.
What you do with the findings depends on their age and current status. For each finding, you need to answer three questions:
- Is the credential still active? (TruffleHog verifies this; for Gitleaks findings you check manually.)
- Is there evidence the credential was accessed from outside your organization?
- Can you rotate it without downtime?
For active credentials, rotate immediately and do not wait for the full investigation to be complete. Rotation is a contained action. Investigation takes time. Do both in parallel.
For inactive credentials, document the finding, determine the credential type and original scope, and verify that the key was properly revoked (not just expired). An expired API key can sometimes be re-activated. A deleted IAM user’s keys cannot.
The hardest case is production credentials that cannot be rotated without coordination across multiple teams. I have seen database passwords in git history that required a scheduled maintenance window to rotate because the credentials were embedded in ten different services with no secrets management layer. This is painful but not optional. The pain is the price of not having a secrets management system. Check out our guide to secret management with HashiCorp Vault and AWS Secrets Manager for how to fix that root cause.
Gate 4: Enterprise Platform Scanning with GitGuardian
GitHub’s native secret scanning and GitGuardian fill the platform monitoring role. They watch every push across your entire organization, maintain a centralized dashboard of findings, and send alerts to security teams rather than individual developers.
GitHub secret scanning is built into GitHub Advanced Security and is free for public repositories. For private repositories, it requires a GitHub Advanced Security license. It covers GitHub’s own credential types (GitHub tokens, Actions secrets, Codespaces secrets) natively and has growing coverage for third-party secrets.
GitGuardian is what I recommend for regulated enterprises that need more control and governance. It supports all major VCS platforms, monitors real-time git activity, has native integrations with Jira and PagerDuty for incident management, and provides developer-facing remediation guidance. The enterprise tier includes policy management, historical scanning, and the ability to enforce a “zero tolerance” policy where a push containing a known secret pattern is blocked at the server side before it lands in the repository.
The value of GitGuardian versus open-source alternatives is the workflow integration. When a secret is detected, it creates a ticket, assigns it to the code owner, provides a remediation checklist, and tracks it through resolution. For teams that are managing hundreds of repositories and thousands of developers, that workflow automation is worth the license cost.
Handling Secrets That Belong in the Repository
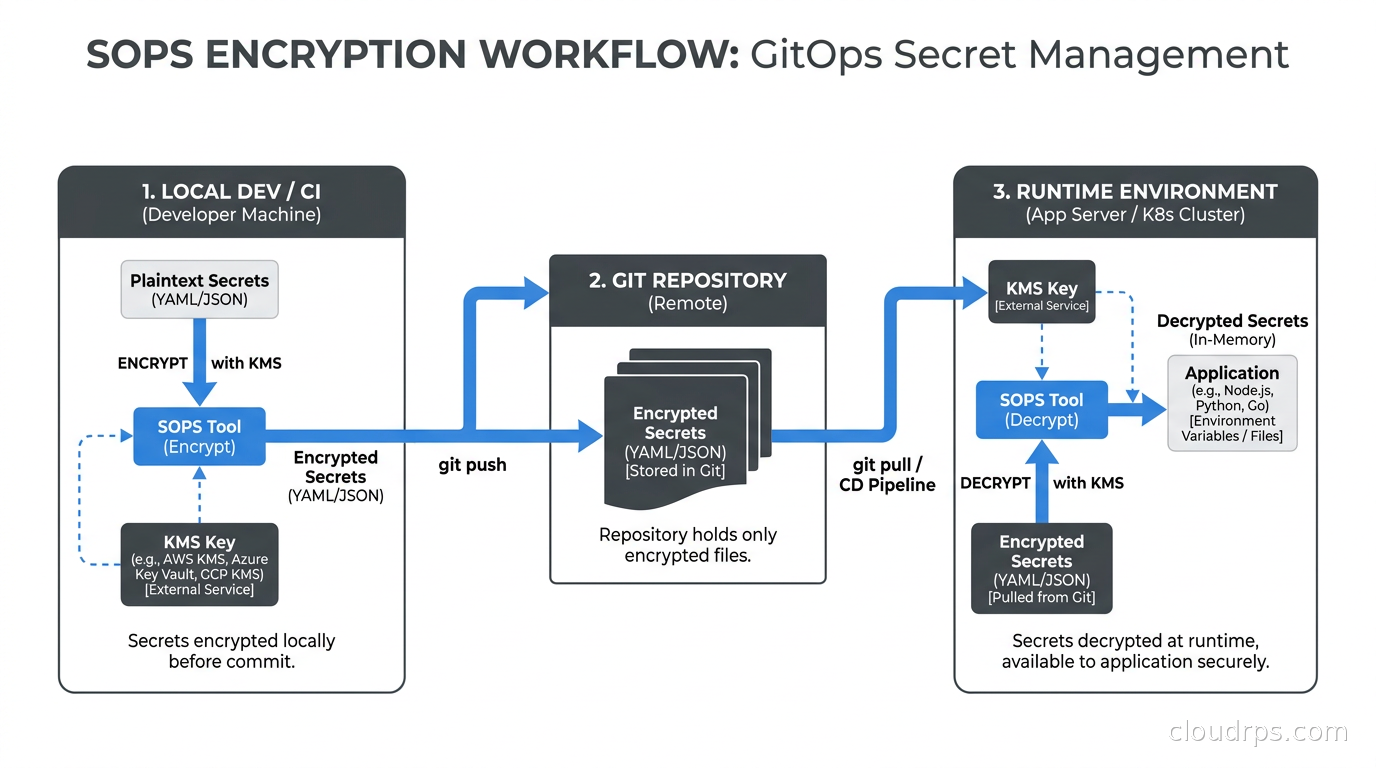
Some secrets legitimately need to live alongside code. Encrypted configuration files, environment-specific values checked into Helm charts, secrets for local development. The answer is not to put them in plaintext. The answer is SOPS (Secrets OPerationS) or age.
SOPS is a file encryption tool that integrates with AWS KMS, GCP KMS, Azure Key Vault, HashiCorp Vault, and age keys. You store an encrypted version of the file in git, and SOPS handles decryption at runtime using the KMS key. The encrypted file looks like this:
# .sops encrypted values
database_password: ENC[AES256_GCM,data:abc123==,tag:xyz==,type:str]
api_key: ENC[AES256_GCM,data:def456==,tag:uvw==,type:str]
sops:
    kms:
        - arn: arn:aws:kms:us-east-1:123456789:key/abc-def-ghi
Gitleaks will not flag this as a secret because the value is encrypted. The actual plaintext never touches the filesystem except in memory during runtime. SOPS is particularly useful for GitOps workflows where Helm chart values or Kubernetes manifests need to include sensitive configuration but the repository is the source of truth for all infrastructure state. See the GitOps with ArgoCD and Flux guide for how this fits into a full GitOps workflow.
For teams using Kubernetes, the ExternalSecrets Operator is the alternative: secrets live entirely outside git, in AWS Secrets Manager or GCP Secret Manager, and the Operator syncs them into Kubernetes Secrets at runtime. No secrets in git at all, encrypted or otherwise.
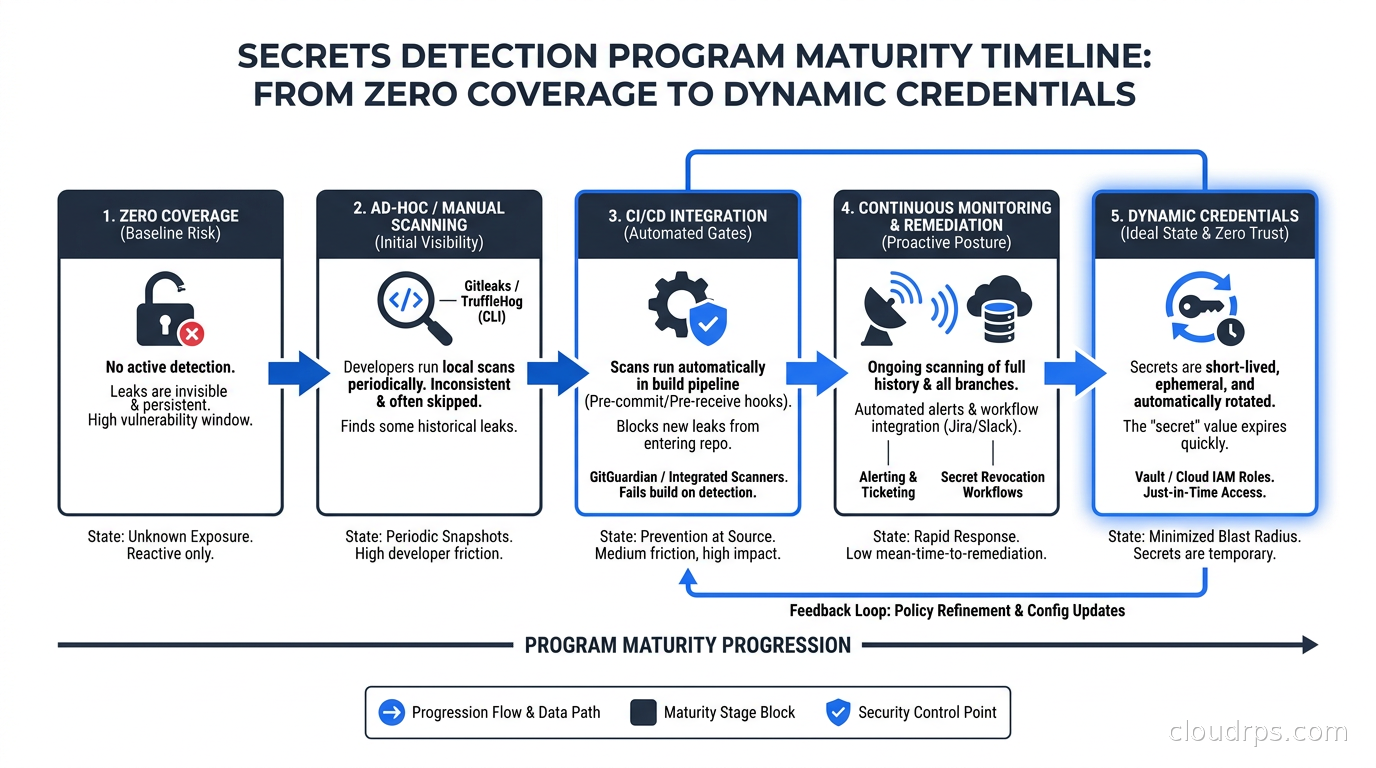
Building the Detection Program: What Most Teams Skip
Running Gitleaks and TruffleHog is the easy part. The hard part is the organizational scaffolding around them. Here is what I have seen mature programs do that immature ones skip.
Maintain a secrets inventory. You cannot rotate secrets you do not know exist. A secrets inventory is a list of every credential in use in your environment, its type, its scope, its rotation policy, and its owner. This sounds boring and it is, but it is what makes incident response fast. When TruffleHog finds a verified AWS key, you want to answer “what does this key have access to?” in thirty seconds, not thirty minutes.
Define a response playbook. When a verified secret is detected at 2am, your on-call engineer should not be making decisions about what to do. They should be executing a playbook. The playbook should specify: for each credential type, who has the authority to rotate it, what the rotation procedure is, and where to look for access logs. Pair this with your existing incident management workflow so detected secrets create incidents with appropriate severity.
Enforce developer education, not just tooling. The tooling catches what already happened. Education prevents it. The most effective intervention I have seen is a specific, concrete onboarding component that shows new engineers an example of what a leaked credential can do (access an S3 bucket, call an API, spin up compute) and explains exactly how your detection pipeline works. Engineers who understand the stakes maintain pre-commit hooks. Engineers who see it as bureaucratic overhead disable them.
Track mean time to rotation. This is your detection program’s primary metric. It is not the number of secrets detected (that tells you about your codebase’s history, not your response capability). It is the time from detection to confirmed rotation. Target under four hours for production credentials, under twenty-four hours for non-production.
The Better Long-Term Solution: Eliminate Static Credentials
Every secret that Gitleaks and TruffleHog find is a static, long-lived credential. An AWS access key that does not expire. A database password that has been the same for five years. An API token that was generated once and shared across multiple services.
The real fix is to eliminate these entirely in favor of short-lived, dynamically provisioned credentials. AWS IAM roles with IRSA eliminate the need for AWS access keys in Kubernetes workloads entirely. GCP Workload Identity does the same for GCP APIs. HashiCorp Vault’s dynamic secrets engine generates database credentials on demand with short TTLs and revokes them automatically. GitHub Actions OIDC eliminates the need to store AWS credentials as repository secrets.
This approach is covered in detail in Workload Identity Federation and Non-Human Identity security. The short version: if a credential cannot be committed to git because it does not exist long enough, the scanning problem goes away. Dynamic credentials are the defense in depth layer that makes scanning less critical while you are in transition and unnecessary once you have fully adopted them.
That transition takes time, and it is not linear. You will have legacy services that cannot be migrated immediately. You will have third-party APIs that do not support short-lived credentials. You will have inherited systems where the credential is baked into a binary that has not been rebuilt in three years. Scanning is how you protect yourself during that transition and maintain visibility into the things that have not been migrated yet.
Container Image Scanning
One more vector people miss: Docker images. If a secret gets committed and then used in a RUN command in a Dockerfile, it ends up in the image layer. Even if you use multi-stage builds correctly, a mistake during development can bake a secret into a layer that gets pushed to your container registry.
TruffleHog can scan container images:
trufflehog docker --image your-registry/your-image:tag --only-verified
Run this in your image build pipeline before pushing to the registry. Combine it with a general container image security scan from Trivy or Grype, which your container image hardening process should already include.
The image scan is particularly important for images that are shared outside your organization. If you publish a public Docker image and it contains a secret in a layer, that secret is now public. GitHub’s secret scanning does not scan Docker Hub. Neither does Gitleaks, unless you pull the image and run the scan explicitly.
Putting It Together
The practical starting point for a team with no existing detection program is this sequence:
Week 1: Add Gitleaks to your CI pipeline as a required check on pull requests. Do not block the pre-commit yet. You want data before you inconvenience developers.
Week 2: Run TruffleHog against your five most critical repositories. Triage the verified findings. Rotate active credentials. Document the rest.
Week 3: Roll out the pre-commit hook via your developer setup documentation or a platform team-managed dotfiles repo. Announce what you are doing and why.
Week 4: Run the full historical scan against all repositories. Expect to find things. Have your response playbook ready before you run it.
Month 2+: Enable GitHub secret scanning or GitGuardian. Build the secrets inventory. Start the process of migrating high-value workloads to dynamic credentials.
This is not glamorous work. There are no architectural diagrams that make it look impressive. But I have watched it prevent breaches in organizations that had already suffered one, and I have watched organizations skip it and suffer the consequences.
The billing records in that S3 bucket I mentioned at the start? Nobody had accessed them. We were lucky. Luck is not a security strategy.
Key Takeaways
Gitleaks at Gate 1 (pre-commit) and TruffleHog at Gate 2 (CI) give you the basic coverage every team needs. TruffleHog’s credential verification is the difference between a scanner that generates noise and one that drives action. The historical scan is uncomfortable but unavoidable for any repository that predates your detection program. The long-term investment is eliminating static credentials entirely through zero trust approaches like workload identity federation, but scanning is what protects you in the meantime.
Secrets detection is not a tool problem. It is a program problem. The tools are free and they work. The hard part is the organizational discipline to run them consistently, act on their findings quickly, and measure your progress until dynamic credentials make most of this unnecessary.
Get Cloud Architecture Insights
Practical deep dives on infrastructure, security, and scaling. No spam, no fluff.
By subscribing, you agree to receive emails. Unsubscribe anytime.